

Daily readers of this site already know how I feel about sharpness. Sharpness is vital to professional photographers who make large prints, but beginners probably will not notice much of a difference between a razor-sharp photo that they view on a computer screen compared to a fairly-sharp photo that they view on a computer screen. Nonetheless, photographers are crazy about sharpness, and I am too.
Sharpness Tip #1: Shoot like a sharp-shooter
Anyone who has ever shot a gun or bow and arrow knows that the key to shooting well is finding a firm shooting foundation. Shooters do this by stabilizing themselves against a bench, using a monopod, or standing in the most stable positions. Not surprisingly, photographers should use the same advice. If you haven't taken a minute to consider whether your photography posture is solid, think about it for a minute and decide how to improve your stability. If you don't regularly use a tripod, just do it!
Sharpness Tip #2: Don't zoom to the extremes
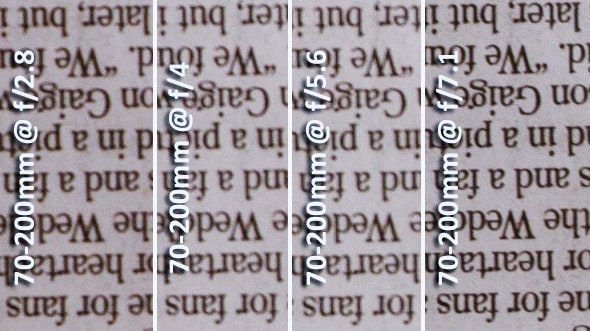
I have never tested a lens that is sharpest at the extremes of the zoom range. For example, if you shoot a 75-300mm lens, you will get sharper photos at 280mm than 300mm. The Nikon 70-200mm lens shoots sharpest at 135mm. I'm sure there are exceptions to this rule, but I haven't seen them personally. Almost all lenses are sharper somewhere between the extremes of the zoom range.
This is especially important if you are shooting a less expensive zoom lens or a kit lens. Spend just a minute and take a picture of a newspaper taped to the wall across from you at different focal lengths and apertures. You're likely to find quite a variation in sharpness levels depending on the focal length.
Sharpness Tip #3: Determine your sharpest apertures
Just as the zoom dramatically impacts sharpness, so to does the aperture.
Many photographers learn that the sharpest aperture on many lenses is f/7.1 or f/8, but it totally depends on the lens. That is a good general rule, but it is foolish to accept this as 100% true. Just take a minute to lock your lens on a tripod and shoot a subject at all of your aperture levels to see what photo is sharpest. If you are a landscape photographer, you will likely notice that many wide-angle lenses are significantly sharper at slightly higher apertures, because they are made that way. This test will only take you 5 minutes to perform and will improve your photos for the life of the lens.
To test sharpness, make sure to shoot from a distance that you commonly shoot that lens, shoot in lighting conditions similar to what you will shoot in the field, and do common-sense things like shoot on a tripod with a cable release and mirror lock-up.
Sharpness Tip #4: Do Your Output Sharpening Last
Unfortunately, many photographers use the sharpness slider in Camera Raw or Lightroom first thing. I strongly discourage this technique because sharpening should match the medium, or be applied selectively.
Photos should be sharpened differently for the use on the web as they are for print. For example, when saving a photo that will be displayed on a computer (like posting a photo to Facebook, for instance), less sharpening is needed because a screen is a sharp output medium. When saving a photo for matte paper, more sharpening should be applied than when printing on glossy paper because the matte paper soaks the ink more than the glossy does.
Also, a photo that will be seen small should be sharpened differently than photos that will be seen large. It just doesn't make sense to sharpen before finishing the editing process. This way, you'll be able to go back and re-sharpen the photo in a different way when you want to use that photo for a new purpose without needing to re-do all of the other edits done in Photoshop.
[callout type=”center” title=”Photography Portfolio Reviews – $39″ message=”Have the expert editors at Improve Photography review your photography portfolio in-depth and send you an audio feedback file for just $39″ button_text=”Check it out” href=”https://improvephotography.com/online-portfolio-reviews”]
Sharpness Tip #5: Stop mashing your shutter button
In my photography workshops, I see many photographers smash their shutter button with more force than they would smash a cockroach. Mashing the shutter button will torque the camera at the critical moment when the photo is recording the scene. The proper way to press a shutter button is to simply roll your finger back across the button.
Sharpness Tip #6: Pick up the manual for your LENS
The lens manual will tell you whether or not to use image stabilization (vibration reduction for us Nikon folks) when the camera is on a tripod. Some lenses should have vibration reduction ON when using a tripod, and other lenses should have image stabilization turned off when on a tripod.
Lenses made in the last couple of years will make this switch for you, but you'd probably be surprised by looking at the manual for your lens to find that many lenses that you think may be turning this off for you… are not. The only way to know is to check the lens manual.
Sharpness Tip #7: Decrease Your ISO
Photographers know that increasing your ISO increases the noise in the photo, but their knowledge usually stops there. Did you also realize that increasing the ISO also dramatically reduces the visible detail in the photo? When I say “dramatically,” I mean dramatically!
When you're in a situation where you have to increase your ISO beyond where you're comfortable, consider adding flash or moving to an area with better lighting to produce a sharper shot.
Sharpness Tip #8: Test different copies of a lens
When lenses are created, they are made to certain tolerances. Especially in the case of lower-end lenses, the tolerances are not precise and allow for size variances. For this reason, one lens may shoot better on one camera than another. Make sure the lens is working well for your camera. If it isn't, you might consider returning the lens and buying another copy of the exact same lens model and see if it works better.
Sharpness Tip #9: Know Your Focus
I've given portfolio reviews to THOUSANDS of photographers in my online photography classes just in the last year. THOUSANDS! When they ask me about the sharpness of their photos and how they can improve, the problem is imprecise focus at least 95% of the time.
So here's my recipe for proper focus every time…
#1. Decide if you are shooting an action photo or a photo with a stationary subject. If you're shooting a moving subject, choose continuous focus (AI servo on Canon or AF-C on Nikon). If you're shooting a stationary subject like a landscape or a person standing mostly still, choose AF-S on a Nikon or Single Servo on a Canon.
#2. Always choose the focus point yourself. Don't let the camera decide. Get used to moving the focus point with the four-way selector on the back of your camera. If you're shooting a portrait, ALWAYS place the focus on the eye of the person closest to the camera. On the nose or face or body of the person is not good enough. Always focus on the eye. If you're shooting a landscape, generally focus one-third up from the bottom of the frame, but if you have a strong foreground element, you may want to focus closer.
#3. Once you've focused, be extremely careful not to sway forward or backward at all. When shooting with a fast lens at a wide f-stop, even a slight movement will move the focus before the shot.
#4. Be sure not to focus too close to the lens. Each lens has a close focus distance, and the camera manufacturers like to push the envelope with this distance. I usually find that if I focus right at the closest point where the lens will still focus, the result is a blurry shot. Back up a little bit from the closest you can be to the subject and you'll always improve the result.
Sharpness Tip #10: Upgrade your shutter button
Less expensive cameras come with either a metal or plastic shutter button. It does the job just fine, but it encourages the poor habit of “clicking” or “mashing” the shutter button. More expensive cameras like the 5D Mark III, Nikon D810, etc, have squishy shutter buttons with a rubber coating on top so that the press of the button does not vibrate the camera as much.
For only a few dollars, you can pick up a rubber pad to fit over your shutter button which will solve this problem and upgrade your shutter button for you.
Bonus Tip: Zoom to the Eyes!
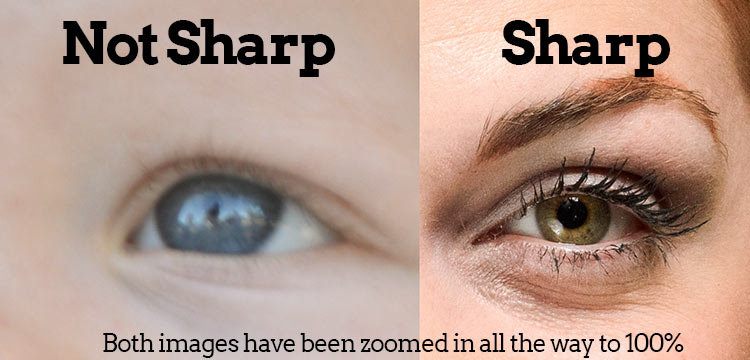
The best way to know if you have a sharp photo while shooting is to zoom in on a picture you've just taken all the way to 100%. Zoom in on the eyes and see if you can see the eyelashes. If the eyelashes are just a clump of black, the photo is not sharp. If you can see each hair in the eyelash, you have a sharp shot.
If you have more sharpness tips, please share it with the rest of the Improve Photography community by leaving a comment below.
Great tips Jim!
One tip I have about focusing on the eyes is that if the subject head is angled so that one eye is closer to the camera than the other is, focus on the closest eye to the camera. It looks odd if the closest eye is not sharp and far eye is.
The ads on this mob version of the site are killing the experience for me. Stuttering and loads of moving images like back 10years ago on porn sites
Looked like goody tips too shame
Tip #11: Be lucky, It is necessary in many-many cases.
thanks
This is a very good nad more informative idea about photography. I have more benefited from this informative idea.thaks for your knowledge sharing.
Your website is phenomenal !
Thank you for sharing all this info.
I am a “non-manual” setting long-time amateur. (almost 40K photos on my cloud.)
All relevant to what I am doing – taking photos of our figure skaters in arena lighting….
I just bought a 70-200 Nikon lens and am learning how best to use it.
One (of many!) key points you suggest is the 135 mm sweet spot.
Cheers.
Like it. Thank you so much. If anyone using Sony a58, please contact me via instagram.
Instagram.com/gbarani
Thanks.
Excellent! Thanks so much for answering my question. I’ll definitely be try these techniques on my next shoot!
My lady friend bought a new, kind of expensive, Nikon camera (just the house). Her old Nikon was not a budget camera and lenses used are not bundle lenses. But the problem is that using the old lenses on the new house gave seriously lower shrapnes and colour in all types of pictures taken than with the old system.
She reported the issue to the dealer who sent the new house to Nikon who found no fault in the house.
How is that?? I would expect at least the same type of quality.
Now she has got ill and cannot work, so her budget for this type of hobby is about zero and cannot afford new lenses…
Great tips for shooting sharper photos. Very useful recommendations. I am ready to grab my tripod and start to improve every aspect of my photography style! I know that I should use the tripod on most days, but I keep avoiding the inevitable! I need to make a plan and stay with it . . . gloves here in the New England area for winter photography!
Thank you for sharing your knowledge in such a user friendly manner
for video to take sharp captures, we need image stabilizer and steady hands or tripods. and for photo, we have to use same techniques.
thanks for your nice tips.