
If you're a big fan of Lightroom Presets (like the excellent ones available on Improve Photography +), then Photoshop Actions are going to blow your mind. You get the same, one-click convenience, without the crippling limitations of Lightroom. Adjust the opacity of the entire layer, use masking to apply selectively, or harness the power of blend modes, it's all possible with Photoshop Actions. The best part? You can create your own Photoshop Actions to automate frequently performed tasks and you can find tons of useful actions to download for free! I've taken the liberty of recommending a few that I find particularly useful in my own workflow.
Lightroom Hater?
Now, before you accuse me of being a Lightroom hater: I'm not. Lightroom is an essential part of my photo editing process. Every single one of my photos gets RAW adjustments in Lightroom, while only a select handful make it into Photoshop. Adobe Lightroom and Photoshop are different programs, with different uses. They are both essential, I get it. Lightroom Presets can be a huge time saver for batch editing photos. When they work, they work. The thing is…they don't always work. Once you apply a preset in Lightroom, it affects the entire photo and the masking brushes and gradients are no help.
Teensy Tangent…
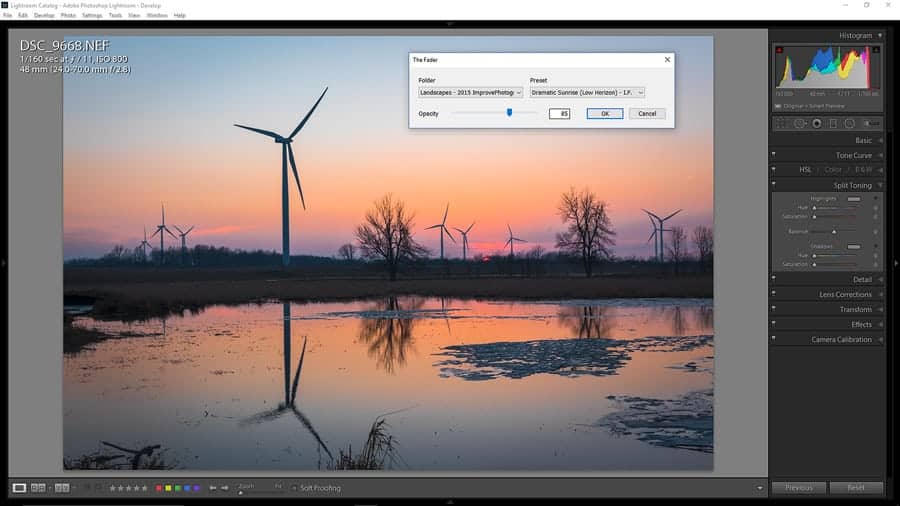
To be honest, I used to avoid Lightroom Presets altogether because of the inability to control the opacity of the effect. If you have ever felt the same way, you MUST check out a Lightroom Plugin called The Fader. This plugin allows you to control the opacity of your Lightroom Presets (including increasing the effect to 150% so that, in their words, you can “over process your over processing”. I don't recommend using this feature very often). This is not an ad, The Fader is a plugin that I paid for and would pay for again. I would seriously never use presets if it weren't for The Fader. Problem is, even with this powerful plugin, the control freak in me still isn't happy. The effects of the presets are still global, affecting the whole image. I still can't apply textures or overlays. I need more. I need Photoshop Actions.
What Are Photoshop Actions?
Photoshop Actions are like Lightroom Presets on steroids (with none of the rage…ok, very little of the rage). They are a pre-recorded set of instructions that are applied when you hit the “play button. You can add multiple adjustment layers, to control contrast, tone, color and clarity, but with Photoshop Actions, that is only the tip of the iceberg. Because we are now in the layered land of Photoshop, we can add fill layers, textures, and overlays to our Actions. We can adjust the overall opacity, or control the opacity of individual layers. We can apply masks and selectively apply and remove the effects with brushes and gradients. To summarize, Photoshop Actions are awesome.
Why Would You Make Your Own Photoshop Actions?
If you find yourself repeating the same tasks over and over in Photoshop, then you should consider recording a time-saving Action. Some common edits that you might consider automating are:
- Creating an export Action that will resize and sharpen your photos for sharing on social media and add your watermark – all with one button click
- Recording an Action that creates and names Dodge and Burn layers, using your preferred method (there are many)
- Making an Action to create a simple vignette that can be easily masked off of the subject (example below)
How Do You Create Your Own Photoshop Actions?
Quaintly enough, you “record” them, just like you recorded your favorite TV shows with the VCR (or PVR, for the younger generation). It is relatively simple, but you may want to practice or write down your steps ahead of time. At first, you will likely run into issues, until you learn to think like a computer. I will discuss two of those in the very basic example below, where I will record a Photoshop Action to add a vignette to my photos. Follow along, if you'd like!
-
Open the Actions Panel
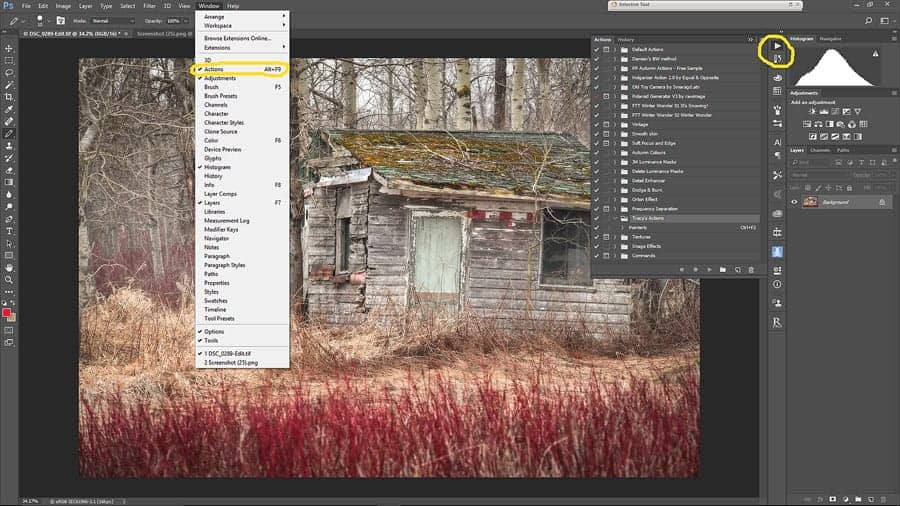
You can open the Actions Panel a few different ways. The keyboard shortcut is ALT (or Option) + F9. Alternately, you can access it from the Window dropdown list from the menu across the top of Photoshop, or through the tab in the History panel.

As with all things in Photoshop, there are many ways to access the Actions Panel. -
Note The Default Actions
In case you hadn't noticed before, the Photoshop Actions panel comes preloaded with a bunch of Actions to get you started. I personally use these rarely, preferring others I have found or created, but this is a good place to start playing around to get an idea of how Actions can be used in your workflow.
-
Create A New Folder For Your Custom Actions
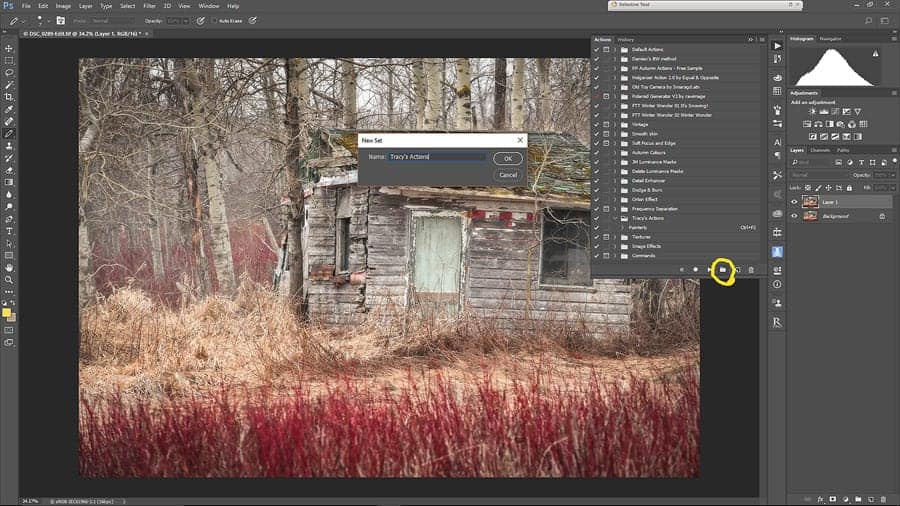
Keeping organized is important. Click on the folder icon to create a new folder for your custom Actions to live in.
Create a new folder for your custom Actions. -
Create A New Action
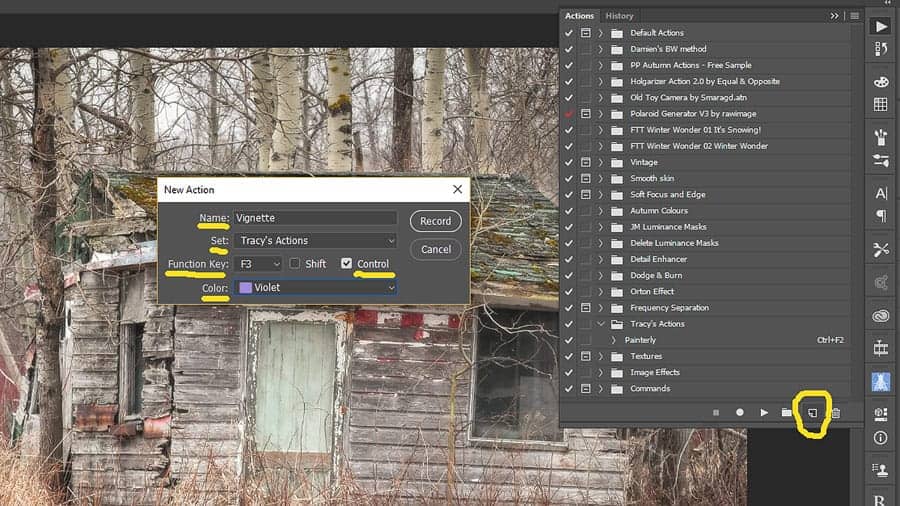
Click on the button that looks like a sheet of paper with one corner folded. This will bring up the New Action panel. Here, you can name your Action, assign it to a folder, and give it a keyboard shortcut and color tab, if desired. Once you've filled these fields in, you're ready to hit record.
Once you've named your Action and assigned it to a folder and keyboard shortcut, you're ready to start recording! -
Record Your Edits

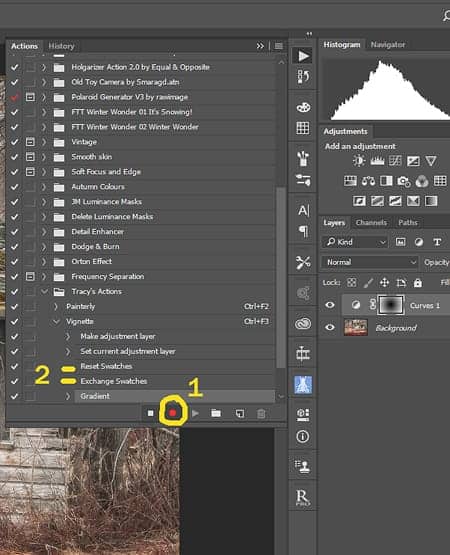
When recording Photoshop Actions, it is a good idea to add steps like resetting swatches to defaults or you may end up with surprising results. Once you've pressed record, most everything you do will become a part of your Action. (There are some limitations, which I will discuss later.) This is why it is a good idea to practice your sequence ahead of time, to avoid adding unnecessary or undesired steps into your Action. The red circle at the bottom of the panel shows that you are recording (1). For my example of creating an Action to add a simple vignette, I will add a curves adjustment layer and pull the curve down a bit in the middle, to darken the image. I only want to darken around the edges of the image, so I'm going to add a white mask to the layer and then use the gradient tool to paint a round, black gradient radiating out from the center of the image. When you are finished performing your edits, simply hit the white square “stop” button, to the left of the record button.
-
Reset Color Swatches
If you will be using masking in your Action, it is good practice to reset your color swatches to default while recording the action and select your masking color from there, even if it was already the color you wanted (2). (In this example, the black swatch was already my foreground color, but it might not be, next time I run the action on another photo.) I hit “d” to restore my swatches to the default white foreground, black background. Then I hit “x” to switch the black swatch to the foreground. Now that is a part of my Action, so if I am painting some orange color onto a sunset and then run this action on the photo, it will paint a black gradient on my mask, rather than an orange one.
-
Keep Image Sizes In Mind
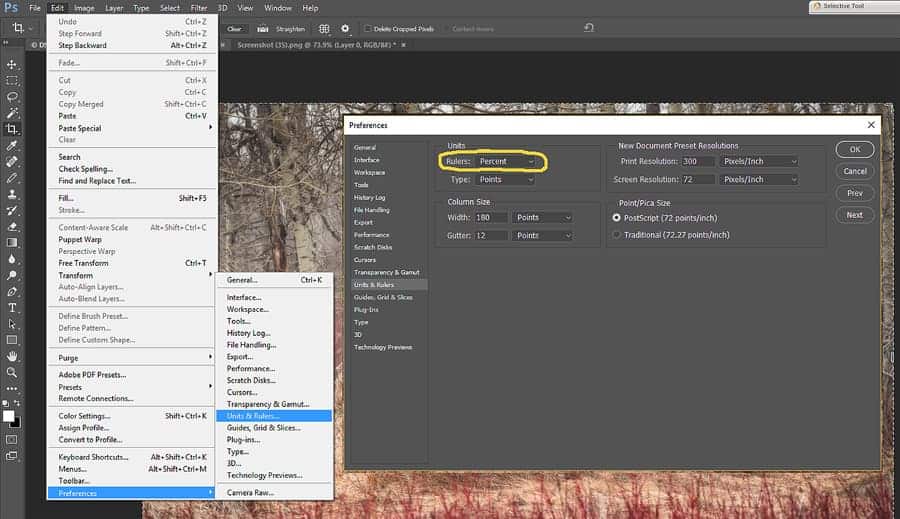
You will probably want to run your Action on photos of differing sizes. This can become a little tricky, even in our simple example of the vignette. Depending on sizes and crops, the vignette we've just created may not be centered or cover the image the way we expect. There is a simple way to combat this issue. Go to Edit > Preferences > Units and Rulers and change the value for Rulers to Percent. Now it will scale your masks to fit the individual images, rather than applying them in a set size.

Change the Rulers to percent in your preferences, so that your recorded Actions will work on images of different sizes. -
Add Pauses and Stops For Fine Tuning

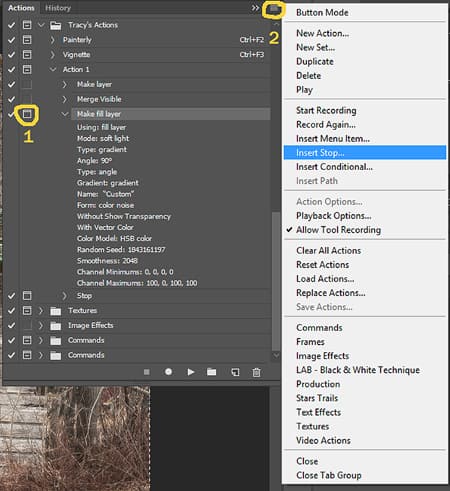
Insert pauses and stops to customize steps in your Photoshop Actions. The beauty of Photoshop Actions is that they can perform complex tasks. Some adjustments, like gaussian blur or sharpening, are not one size fits all. To program the Action to pause at one of these adjustments, and give you the chance to choose your settings, simply expand the recorded Action in the Action Panel. Toggle the little square to the left of the step that you want to customize (1). Now, when you reach that point in the Action, it will pause and wait for your input before continuing to the next step. Other steps you may want to add to your sequence can't be pre-recorded at all. For example, painting an effect selectively onto your photo. In that case, you may want to insert a stop (2) which will allow you to perform the required task before continuing. A window pops up, where you can type in an instruction for the stop, in case you forget or are sharing (or selling) your Photoshop Actions with others who may not know what to do.
-
Play Your Actions Again and Again
Now that you've created a Photoshop Action, you can use it whenever you want by highlighting it and clicking the play button. (The white triangle pointing right, at the bottom of the panel.) You can also edit your Action, at any time, if you decide you need to add or remove a step.
Ugh, That Seems Like A Lot Of Work
It's not, really, but I realize it can be confusing. Fortunately, others have come before us and have generously shared their Photoshop Actions. Of course, there are many excellent paid Actions and Panels, but here are a few of my faves that you can grab right now for free.
- The Easy Panel from Shutter Evolve. You may have heard a lot of buzz about luminosity masks recently. Jimmy McIntyre's Raya Pro panel is an amazing tool for creating and using luminosity masks and so much more. Only trouble is, you have to pay for it. If you're not ready to make an investment into one of the paid luminosity mask panels, his Easy Panel has everything you need to get started, for free. It also includes some other really cool Actions, like Orton Effect and Fall colors, as well as sharpening, dodge and burn, resizing, and exporting actions. Even if you download none of my other recommendations, make sure to grab this one.
- The Frequency Separation Action from Phlearn. This is a free video tutorial on frequency separation and shows you how to create the action yourself, but includes the Action as a free download, as well.
- This Instant Snow Action from Gavtrain, which has 3 individual layers of different sized snowflakes for a nice, natural look.
- Polanoid Generator – Admittedly, this is not an Action set you are likely to use often. It is a very specialized effect, and the whole retro thing is over. However, it is really cool and does create a whole bunch of different and very realistic looking retro instant photo effects. This is just a really fun Action to play with and it will help give you some concept of all the different things you can do with Photoshop Actions.
Load Your Actions
Once you have downloaded your Actions, it is quite simple to load them into Photoshop. Find the Action in your downloads folder and unzip it, if necessary. Next, go into the Actions Panel and click on the menu drop-down on the top right (the stack of horizontal lines). Select Load Actions and navigate to the Action in your downloads folder. Double click to load it, and you're done! That Action will now be available in you Actions Panel, whenever you want to use it. All downloads are at your own risk – neither Improve Photography LLC, nor I take any responsibility for any negative consequences resulting from downloading these free Actions. That being said, I have personally downloaded and used all of these Actions without any issues and believe them to be quite safe. You can find thousands of free Photoshop Actions to download online, but do try to be a little bit cautious and only download from reputable sources.