

Lightroom to Photoshop & Back! Roundtrip 101
Adobe Photoshop Lightroom (The Applications official name) and Photoshop are two extremely powerful and therefor popular image editing applications. In addition to the many tools available to us in Lightroom, we also get an exceptionally good file management system that keeps our thousands of files neat and orderly.
On the editing side of things, Lightroom is more than enough for most images. Many photographers are more than pleased to know that obtaining great, professional images with just Lightroom is totally possible. However, there is Adobe Photoshop, Lightroom’s much more mature big brother. Everything that Lightroom can do to an image in terms of editing, Photoshop can also – and in many cases much better.
But how do we know we are working between these two applications correctly? Are my settings right? Where do my files go? What are they named? What color space do I work with? What, Why, When, ETC?!?! It can get a little confusing and to add to this it seems some have different answers.
What This Article Explains
This article is written to explain a RAW image workflow. We will be dealing with 16 BIT images for the fine benefits that a 16 BIT file offers vs 8 BIT JPEG files. If you shoot IN CAMERA JPEG, this article isn't really for you. For those of us who shoot RAW for the HUGE list of editing advantages, follow along to optimize both Lightroom and Photoshop to work together best.
Preparing Lightroom & Photoshop to Work Together
When you open Lightroom’s Preferences and go under the “External Editor” tab, you will be presented with the following screen:
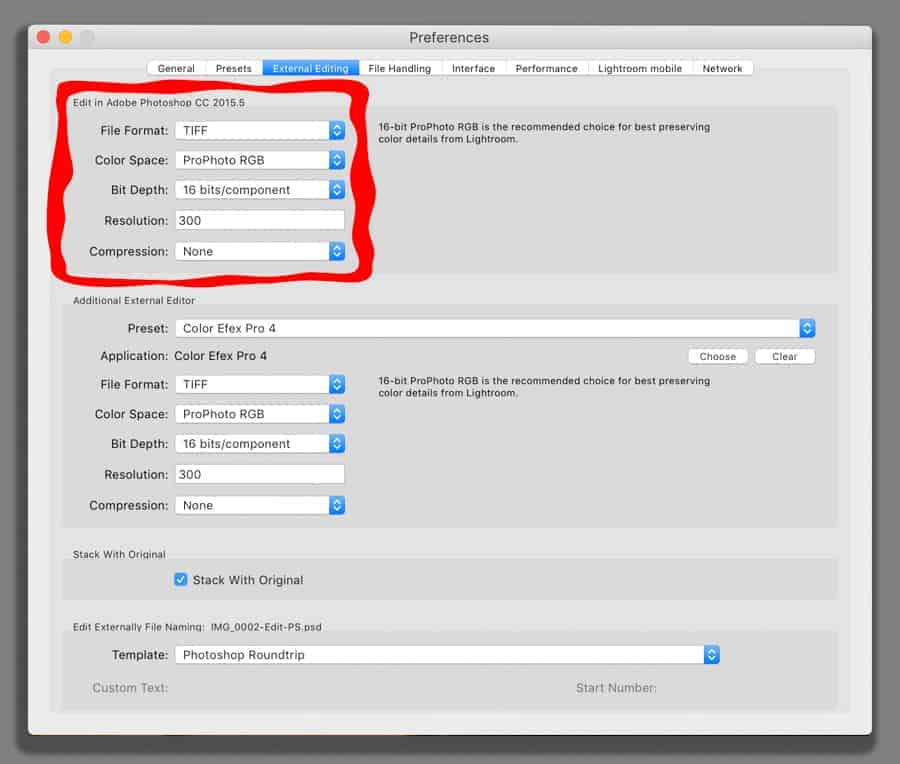
If you are an Adobe CC user, there is a very good chance that you have Photoshop Installed along with Lightroom. The Photographer’s plan is set up for LR and PS to be installed together. If you don’t have Adobe CC but have LR and PS installed on your computer, the Primary External editor will be Photoshop. You can also have Adobe Elements installed rather than Photoshop and it too can be used as the Primary External Editor. ONLY those two can be used as Primary Editor. For most reading this, our concern is with Photoshop working with Lightroom so we will
continue down that path.
Primary External Editor Settings
For the file format, you will have two choices:
TIFF (Tag Image File Format) or PSD (Photoshop Document). This seems like a no brainer since we are working with two Adobe Products and Photoshop happens to be one of the Applications we are working with. Logic says to use PSD, right? Logic be damned!
Adobe Engineers themselves have suggested, along with other leaders in the industry, that the best file type to use is the TIFF file format. When you choose PSD, you are warned how PSD files can be less efficient than TIFF files with respect to metadata updates. Also, make sure “Maximize Compatibility” checkbox is clicked on. But why bother with all of this?!?
Save yourself the headaches and use the TIFF file format. All of your layers will be saved and in tact for further processing down the road.
Color Space
When you import a RAW file into Lightroom’s catalog (And you should be shooting RAW!), there isn’t any option for you to choose which color space you will be working in. When we edit RAW image data in Lightroom’s Develop module, the software is working in a color space very close to ProPhoto RGB. It is a variation which is called Melissa RGB and the technical differences or similarities between the two are outside the scope of this article. Simply put, Lightroom is working in the ProPhoto RGB color space for all we are concerned – the widest color space available. Widest simply means the most colors. And in this case, we are talking MILLIONS AND MILLIONS AND MILLIONS! In fact, many of these colors are “theoretical” and scientific – the human eye cannot even distiguish many of these colors.
That being said, it is very simple and understandable that we want to use ProPhoto RGB as the color space. Why would we not want the most available colors to work with? It is true that the WEB and most of our displays, even the high Resolution Apple Retina displays, are sRGB displays. They don’t have the wide color gamut of Adobe RGB and certainly not the millions upon millions of colors that ProPhoto RGB contains. So why not select sRGB? The answer to that is – WHY would you? The file is the file. We aren’t exporting this to the web or print just yet. So it is best to keep all those colors even though we cannot see them. Remember, when you export your files from LIGHTROOM to the web, you THEN have the option to export to sRGB and at that point you probably should since the WEB works in sRGB and many printers work best with sRGB files. This is changing, however, as many 8 and 12 ink printers now offer color gamuts that are greater than even the Adobe Color Space. The more saturated the colors, the bigger color change you will notice when exporting out to file and sRGB (explained later). Eventually, through technology, we will hopefully have displays and printers that will display and print ProPhoto for the full color range available.
But what we are discussing here is bringing the RAW file with edits applied to a PIXEL based editor so we want all the information, including color, as we can get. After all, if you work on a file ONLY in Lightroom and export it, you're basically working in ProPhoto and then putting it out to file.
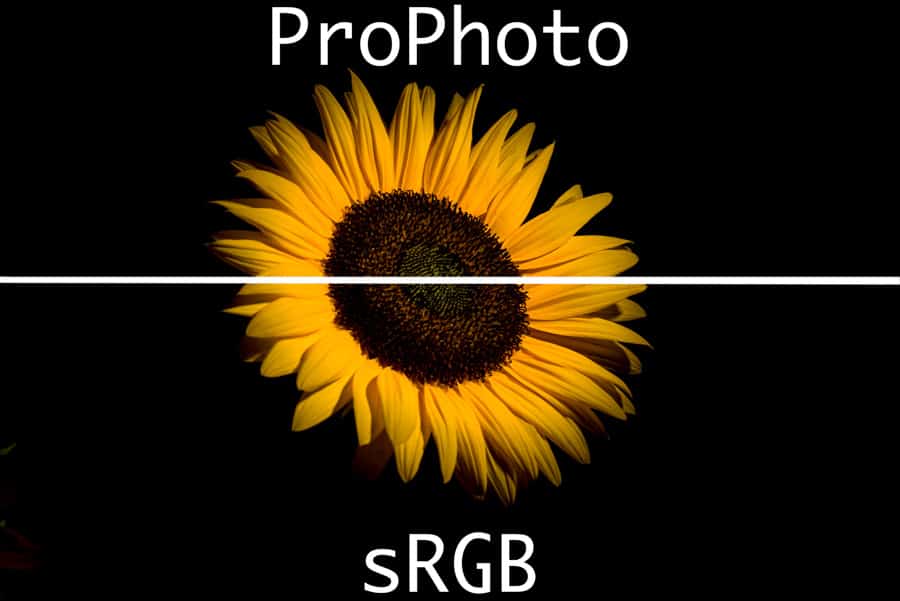
Here is an example. This contains a layer on top that was exported to Photoshop with ProPhoto Space (TOP) and sRGB (Bottom). You will be hard pressed to tell the difference here. When in Photoshop, you can just barely see the ProPhoto file as having slightly more color – especially in the rich and saturated colors. Here, with strong compression, it may not be possible to see any difference. Which begs the question – why not just use ProPhoto Color Space? You should!
So make sure to send your image file to Photoshop with a ProPhoto RGB color space.
BIT DEPTH
This is simple enough. Since we are using a RAW file conversion workflow and want the best file possible, it is quite obvious that we want 16 BIT depth chosen.
RESOLUTION
This can be left at 300. Nothing to add other than just leave it or put the value at 300 🙂
COMPRESSION
This is for the TIF file compression type. You have two choices in terms of compression – LZW and ZIP. You may have seen this before if you've even saved a file from Photoshop as a TIF file (not back to Lightroom). Again, we are working in a RAW, 16 BIT TIF workflow to maximize editing power and control. Therefore, choose the THIRD option, NONE! No file compression is recommended for best performance from the file.
PHOTOSHOP COLOR SETTINGS
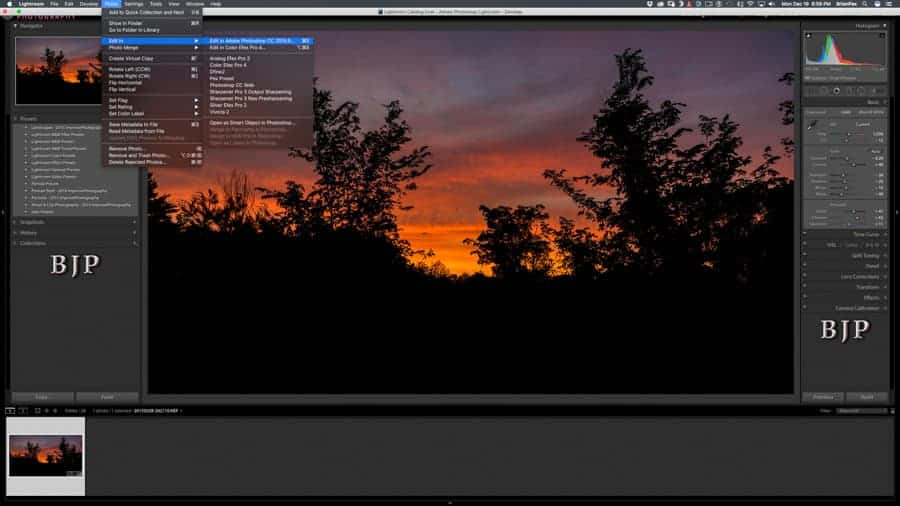
After making the RAW file edits in Lightroom, we select from the PHOTO menu option “EDIT IN > Photoshop CC ### (Current Version)” or simply hit CMD or CTRL E to send the file to Photoshop. Now once here, it is imperative that we have Photoshop set up to accept the file into the working area with the proper settings. They are as follows:
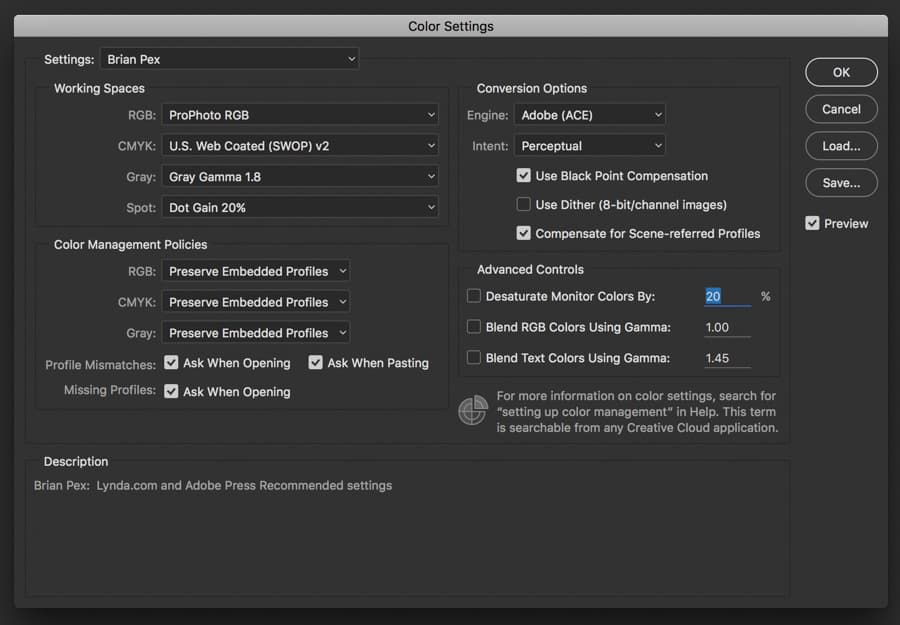
For the Working SPACES, under RGB, set it to ProPhoto RGB. You can leave CMYK set to this setting – we are not concerned with this right now (You may want to contact your commercial Printer to ask which setting they recommend). GRAY can be set to 1.8 because this is what has been recommended as the best option when working with ProPhoto RGB. Sean Bagshaw is a top photographer who recommends this in his training series dealing with Luminosity Masking.
Color Management Policies can be set as such but it is personal preference if you are asked when Opening or Pasting.
Under Conversion Options Engine set to Adobe (ACE) is to be left this way.
Intent is set to Relative Colorimetric by default and that's fine for graphics and design work but for continuous tone photographic images, Perceptual is the best setting to use, especially in regards to digital photography.
Those are all the settings you need for Lightroom and Photoshop to work together in perfect harmony in a professional RAW, 16 BIT workflow.
SAMPLE WORKFLOW
I will now take a Photograph from my Lightroom Library that has had basic edits applied and bring it into Photoshop for a text layer, an added half moon and then back to Lightroom. This is a simple image of a nice sky with silouetted trees in the foreground. We will add “Summer 2016” beneath the Sunset in dark area of the image and a moon somewhere in the sky.
By hitting CMD (Or CTRL on PC) & E, the current file will be sent directly to Photoshop. When working with RAW files, all your edits in Lightroom will be visible in Photoshop. When editing NON RAW files, Lightroom will ask if you want to Edit the Original File or a Copy of the Original. This is important because sometimes we want to go back into Photoshop even after coming back to Lightroom. At that point, it would be a TIFF file (according to our settings). ONE IMPORTANT thing to remember when saving your files back to Lightroom is to always CLOSE THE FILE in Photoshop once saved into Lightroom by hitting CMD/CTRL & W. The file will close immediately when doing this UNLESS further changes were made after the initial save.
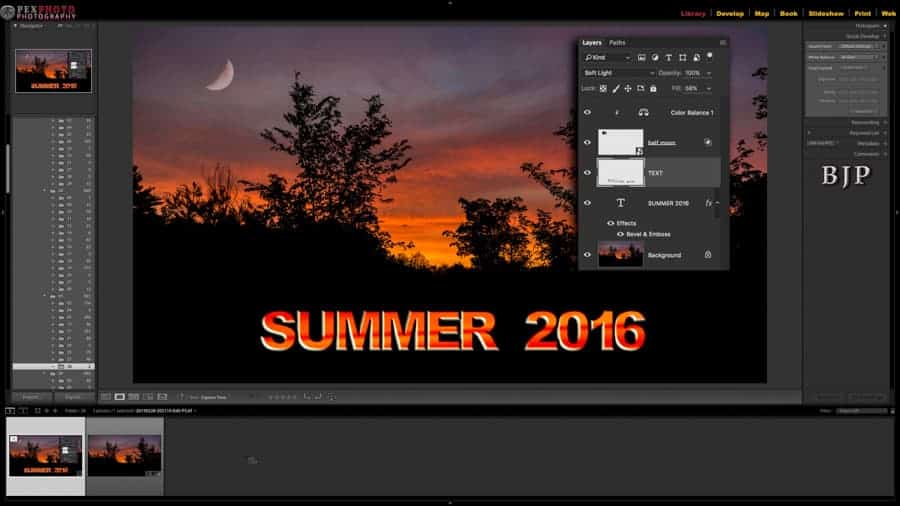
The layers shown are only there because I did a screen capture of just the layers panel and pasted it to the image just to show the layers used. This file was saved with all the layers so it could be opened again as the original TIF and you'd have access to everything except the HISTORY states within Photoshop, Once the file is closed, the History states are wiped out.
EXPORTING OUT TO FILE OR PRINT
Finally! We are now ready to take this wonderful work of ART and put it out on social media for all to see and envy! What should we do? What settings? sRGB? ProPhoto? Adobe???? ARGH!
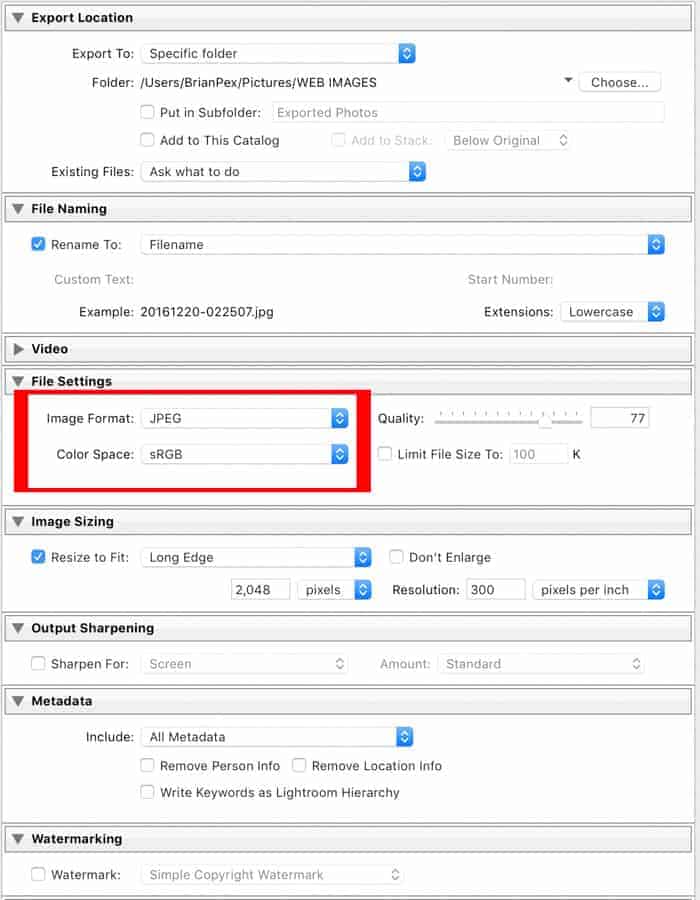
This is simple! Since the vast majority of displays out today are sRGB capable, your best bet and recommended choice would be JPEG and sRGB. sRGB will assure you that it looks very much the same over a large amount of different displays. Personally, when I have tested this exporting bright, vibrant and saturated colors, there tends to be a little fall off from the displayed image in Lightroom. It is very slight and remember, you're going from a HUGE color space to a much smaller one. I have also exported as ProPhoto and, to me, it looks exactly as it did in Lightroom. I use an iMac 5k, and an iPhone 7 – maybe they display the colors nicely!! To be honest, it looks better to me exported as ProPhoto and that is against what most say you should be doing (exporting to sRGB is the norm).
If you chose to send the file to Photoshop as sRGB instead of ProPhoto (Earlier in this process), you would have had this drop off in color information earlier in the editing process. I bring this up because you're going to lose a little bit (AND IT IS VERY SMALL) anyway so you may as well keep that information right up until the end when it is time to export.
CONCLUSION
To wrap things up, think about it:
When you are shooting RAW, you camera does NOT assign a color space. That sRGB or Adobe color space setting in your menu? Only applies to JPEGs, not RAW. Your camera is capturing the visible spectrum of light through binary coding on the digital sensor. This information is then stored on your memory card. The memory card (Or Camera) is then plugged into the computer and Lightroom Imports this image data. You make edits in Lightroom working in ProPhoto RGB (Like I said, technically Melissa RGB but trust me, they are the same as far as we are concerned!)
Now you want to edit more in Photoshop. You send the file over to Photoshop instructing the external file editor to make this into a TIFF file with a ProPhoto color space. If you look, Adobe recommends this “16 Bit ProPhoto RGB is the recommended choice for best preserving color details from Lightroom.”
Set the color setting in Photoshop to match this incoming file (shown above) and you're set up with a professional, RAW to 16 BIT TIFF file workflow that will assure you of the best quality file possible.
Please feel free to contact me for anything and everything Photography on Facebook HERE!
Brain: Great, thorough instructions. Thank you so much!
It’s great because of the knowledge you share with us