
There are numerous tips, tricks, techniques, and gadgets that photographers use to create more dramatic and dynamic images. As technology continues its rapid march forward, it seems there is no shortage of new tools that claim to help photographers make better images. It is difficult to know for sure which of those tools will really be beneficial and which ones would likely find a permanent home in a camera bag or collect dust on a shelf.
In this review article, I will take an in-depth look at the Genie Mini, by Syrp. Not only will this review cover what the Genie Mini is and how it works, but I'll also share my own experiences from initial setup to real world usage. Based on this review, I hope to help you determine if the Genie Mini is something that would benefit the type of photography that you do, or possibly be something to help jump start your creativity. Let's get started!
OK, just one more thing before I jump in, and since some may be wondering. Syrp was gracious enough to send me the Genie Mini for the purposes of this review. I came at this from the standpoint of someone who has never used or tried anything like this. Hopefully, you will find it to be very objective and useful for you.
About Syrp
From their website: “Syrp was formed with the goal of providing exceptional film equipment…that bridges the gap between creativity and technology giving film makers the tools they need to get the shots they want without having to be a technical expert.” A glance at their product line-up and you'll see that the Genie Mini is only a small part of who Syrp is and what they do. There are a number of other really interesting looking products for those interested in taking their time lapse or video to the next level.
Introduction to the Genie Mini
I'll admit that I've always been kind of a sucker for time lapse videos. In fact, I published an article about creating time lapse videos on the Improve Photography website a couple months ago. You can check out that article at this link. Being able to see something that took place over the course of several hours compressed down to just a few minutes is intriguing to me. Whether it is clouds moving across a landscape, stars circling around the night sky, or people or traffic going about their day, it's always interesting. The addition of camera motion to a time lapse really takes the production up a notch. Not only are some elements in the frames moving, but the camera itself is also moving in one or more directions throughout the shooting sequence.
The Genie Mini is a motion control device that allows for camera movement around a single axis. It's a relatively small device. Think of an over-sized hockey puck. Therefore, it's easy to stick in a camera bag, or even a jacket pocket to take out shooting with you. The Genie Mini comes with a USB charging cable for charging the internal battery, a 3/8″ to 1/4″ thread adapter, and lens cloth. The Genie Mini has a retail price of $249. A link cable, which connects the Genie Mini to your specific camera model, will need to be purchased separately for $19.
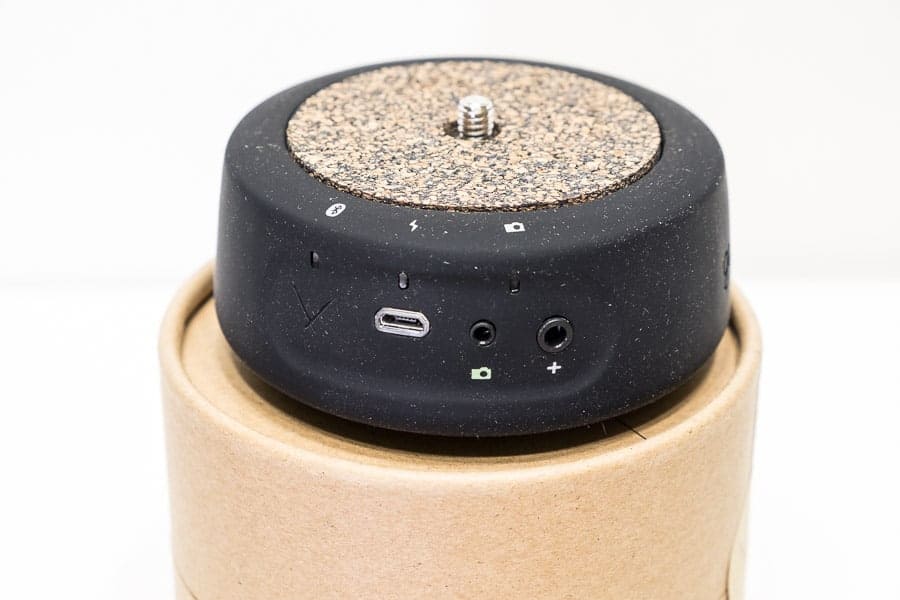
The Genie Mini has a black, rubberized coating on the sides, giving it a very tactile feel. The bottom and top have a cork-like cover, providing cushioning for the connection points. It has 3/8-20 female threads on the bottom for mounting on tripod legs. The 1/4-20 male threads on top are used for connecting a ballhead. The weight limit is dependent on how you are using the Genie Mini. For panning motion, it is specified to hold up to 8.8 pounds, whereas for tilting motion, it will hold up to 6.6 pounds.
There is one soft-touch button on the side of the Genie Mini that is pressed to activate it for connection to your phone via Bluetooth. Additionally, there are three jacks: a mini-USB for charging the battery, a 2.5 mm input for the camera connection, and a 3.5 mm input for connection of a sync cable to pair other Syrp devices with the Genie Mini.

How It Works
The Genie Mini is versatile, allowing not only for the creation of time lapse video, but also panoramas and real-time video. There are many settings for making each shot the way you want as well as advanced features for more creative control. Once you have it mounted on a tripod with your camera on top, you connect the camera to the Genie Mini using a link cable. The control interface for the Genie Mini is available as a free app for iOS and Android devices. After downloading the app, your smartphone (or iPad) is connected via Bluetooth to program the different shooting modes.
Connection to your camera is made by plugging in one end of the link cable to the 2.5 mm jack on the Genie Mini and the other end into the shutter release port on your camera. The link cable is what triggers the camera shutter, so don't forget to plug it in. I forgot a couple of times and wondered why shooting sequence had started, but the camera wasn't firing. Duh! Once mounted and plugged in, press the Bluetooth button on the Genie Mini. A flashing green LED will indicate it is ready to be connected to your phone. Open the GenieApp and connect by pressing “Connect” in the upper right corner. After pairing with the phone, the Genie Mini is ready to set up.
As previously indicated, you have the option of time lapse, video, or panorama. Let's take a look at each and how they work.
Time Lapse
Selecting the Time Lapse option in the GenieApp will give you the choice of setting up a time lapse manually or using a preset. One important thing to note is that you still have to set your camera's exposure for the scene and the desired images. After getting the exposure dialed in, there are three settings in the app that control the time lapse sequence: Record Time, Play Time, and Interval. The three settings are displayed across the top of the app and are accessed by selecting each one individually. Record Time is the duration of the shooting sequence, in hours and minutes. This seems to be an almost infinite setting, but I stopped at 100 hours.
Play Time is how long the final time lapse will play once it is compiled. Interval is the amount of time the camera will pause between each shot. Note that the time lapse settings are tied together and that changing one will change the other. By the way, you'll want to be sure that the interval is long enough to allow the shutter to open and close and for the Genie Mini to move into the next position before taking the subsequent shot.
After making the three settings, you next tell the Genie Mini how far to move throughout the time lapse sequence. The movement can be either clockwise or counterclockwise, and is expressed in degrees from 0 to 360. On the circle, the green dot is the starting point and the blue dot is the end. You can preview the movement by dragging the camera icon to the end of the arc and then tweak it from there. After that is all set, press the big red REC button at the bottom and the time lapse shooting sequence will start. It will continue until reaching the end of the Record Time or until you stop the sequence manually.
Panorama
Shooting for a panorama requires an extra step and a few more settings. After selecting the panorama option in the app, you then need to select the sensor size of your camera. The choices are full frame, APS-C, and Micro Four-Thirds. Check out this article for a discussion of camera sensor sizes. You also need to set the focal length you will be shooting, the aspect ratio (3:2 or 16:9), and orientation (portrait or landscape). After making those settings, select OK at the bottom to move to the next screen. There, you set up the amount of overlap for each image, number of photos to be taken, and the exposure time for each photo.
Generally speaking, you will want 30 to 40% of overlap for a panorama, so that would be a good place to start. The number of images will depend on how much area you are trying to cover. The exposure time is the amount of time between each shot, so that the Genie Mini has time to get into the next position before the shutter opens again.
Video
Selecting the video option, you will find that you can set the speed, play time, and mode. The speed is how fast the Genie Mini will rotate along the path that you select. The speed can be set anywhere from 1%, which is barely noticeable movement, to 89%, which is rather fast. Setting the play time will determine how long it takes the video to record. This setting, as well as the speed, are dependent upon one another. Finally, the mode setting will determine how the Genie Mini moves throughout the path that you have selected. The Repeat Off mode is a single pass along the path you select. If you select the Repeat mode, then the Genie Mini will return to the start and keep making subsequent passes. The Bounce mode will keep moving back and forth along the path. Continuous mode will keep the Genie Mini moving around the entire circle in a continuous panning motion until you stop it.
When using the video function, you have to first start the video recording on your camera, then begin the panning motion using the GenieApp. For this reason, the camera link cable isn't necessary for creating panning video with the Genie Mini.
Advanced Settings
Within each of the three shooting options, there are advanced settings that can be accessed for additional control of the Genie Mini. To access the advanced settings, select the plus sign (+) in the bottom right corner on the settings screen. The available advanced settings will depend on which shooting mode you are in. For time lapse, advanced settings include movement ease in/out time, high dynamic range (HDR), movement type, and move shoot delay. In panorama mode, the advanced settings are HDR, repeat mode, and move shoot delay. For video, the only advanced setting available is movement ease in/out time. Each of these settings will be discussed briefly below.
Movement Ease In/Out Time
In time lapse and video shooting mode, this is the time it takes for the Genie Mini to ease into and out of the programmed movement. This is a way to ramp up to full speed at the beginning and then slowly ramp back down at the end. This setting provides for smoother transitions for the time lapse and video productions.
HDR
The Genie Mini can be set up to shoot bracketed images for both time lapse and panorama image sequences. To use this feature, you need to set your camera to HDR or bracketing mode. (Note that these features may not be available on your particular camera model). Then, set GenieApp to hold down the shutter for a specified time to allow the bracketed images to be captured. For instance, if you use 3 image bracketing and total exposure time for the images is 2 seconds, then the HDR would need to be set to at least that amount of time or longer.
Movement Type
This is a feature setting available only in time lapse shooting mode. There are two options for this setting. Move-shoot-move means that the image will be captured, then the Genie Mini will move to the next position before the shutter opens again. This setting would be good to use for longer shutter speeds to prevent motion blur between exposures. Continuous move means that the Genie Mini will move continuously along the programmed path while images are being captured.
Move Shoot Delay
This setting is available for time lapse and panorama. Measured in milliseconds, this is the delay time between panning of the Genie Mini and releasing the shutter. Setting the delay time longer will allow more time for the camera and tripod to get settled before taking the next image. This may be useful in windy conditions or other situations that a delay would help improve image sharpness.
Repeat Mode
Available only for panorama shooting, this is either set to Repeat or Repeat Off. If set to Repeat, the Genie Mini will return home after the panorama sequence is complete and repeat the movement. If it is turned off, then just a single pass will be completed.
Setup and Ease of Use
When I found out that the Genie Mini was on its way to me, I was tempted to watch some on-line tutorials to get a head start on how to set it up and use it. However, I wanted to get a good idea of the intuitiveness of the device, so resisted that urge. In my experience, it was really easy to get started right out of the box. After downloading the app and connecting the Genie Mini to my iPhone, I was prompted to do a firmware update. The update took just a few minutes, then I was up and running. The Quick Start guide included in the package had limited detail about setup, but was helpful to some extent. I had received two link cables, one for the Fuji X-T1 and one for the Canon 5D Mark III. Figuring out which was which was no problem since the camera connection ports on the two cameras are dramatically different.
The GenieApp is really easy to navigate and intuitive to use. Each setting that can be changed has a brief description beneath it, just in case some guidance is needed. One really nice feature is the inclusion of links to feature tutorials within the application. Within any of the settings menus, you can access the video tutorials by selecting the “More Info…” near the bottom of the screen. There are video tutorials on getting started as well as setting up a time lapse, panorama, or video shoot. These videos can also be accessed by selecting the small question mark at the bottom right of the main screen. Additional video tutorials for setup of advanced features are available on Syrp's website or Youtube channel.
One thing I really like about the app is that it doesn't tie up your phone while a shoot is in progress. Once it is programmed and started, you can use your phone normally, or even turn it off to conserve battery. The Genie Mini will complete its programmed move and you can always reconnect the phone later if necessary.

Field Observations
My first impression of the Syrp Genie Mini is that it is a very well made piece of equipment. It has a nice feel, particularly due to the rubberized covering of the sides. The cork material on the top and bottom is a nice touch. It has some give to it to provide a nice cushioned seal when screwing onto a tripod or ballhead. However, the cork is starting to show some wear and I wonder how well it will hold up over time.
The Genie Mini makes a good, solid connection with the tripod legs. I have found that the best way to mount it is to place the Genie Mini on the tripod legs, screw the ballhead on top, then mount the camera on the ballhead. Another option would be to screw the camera directly onto the Genie Mini, but then there is much less control of the camera's position. Another possible configuration, which I didn't try, would be to screw a quick release plate on the bottom of the Genie Mini and mount it on a ballhead. Then, screw another ballhead on top and then mount the camera. That would provide some additional level adjustments, but may be a little top heavy.
In addition to a traditional tripod, I also used the Genie Mini mounted on a Platypod Pro. There is just barely enough room to screw the Genie Mini onto the base plate of the Platypod and then screw the ballhead on top. This setup works well for smaller mirrorless cameras, but as indicated in my Platypod Pro review article, the Playpod Pro Max may be a better option for larger DSLR cameras.
I used the Genie Mini with both the Fuji X-T1 and Canon 5D Mark III cameras. The operation seems to be identical for each. It is important, however, to remember to set your camera's sensor size before shooting a panorama. If you don't you'll either have more overlap than anticipated, or not enough overlap to stitch the panorama.
According to the Syrp website, the Genie Mini has a 48 hour battery life in time lapse mode and 5 hours for video. I can't say for sure if that is accurate. After using it several times to test the various features, the battery never ran down. There is a battery status icon in the app, which is very nice to have. I have plugged the Genie Mini in to the charger three times since I've had it, but each time there was still close to half the battery left.
One very important thing to remember when using the Genie Mini is to keep it level. That is regardless of whether you are shooting time lapse, video, or panoramas. This can be tricky. The setup may be completely level at the starting point, but as the Genie Mini rotates, it may become way off and skew your videos/images. Be sure to test for level throughout the entire motion of the path you set. Both of my cameras have an internal electronic level, but some cameras do not have that feature. There are also small bubble levels that can be placed in the hotshoe. It would be nice if Syrp could somehow incorporate a bubble level into the Genie Mini.
Real World Examples
I tested all the shooting modes on the Genie Mini, but time lapse was by far the most used. That's primarily because I really enjoy creating time lapse videos and learn something new every time. Below area a few real world examples of the Genie Mini in action.
Times Square
I was fortunate enough to take a trip to New York City in early October and decided to take the Genie Mini with me. I knew that tripods are pretty much disallowed everywhere in New York, so I took the Platypod Pro instead. After visiting Times Square on the first night, I thought that would be a cool spot to do a time lapse. There is just so much activity and it never seems to let up. I found a location up against a wall, so that I would be out of the way as much as possible. After setting up the Genie Mini and camera with the Platypod Pro on the ground, I started the time lapse sequence. After standing guard over the camera for an hour and a half, and with a shooting interval of 2.5 seconds, I ended up with 2,161 images. I feel that adding the camera movement made for a more interesting time lapse video in this instance. See what you think.
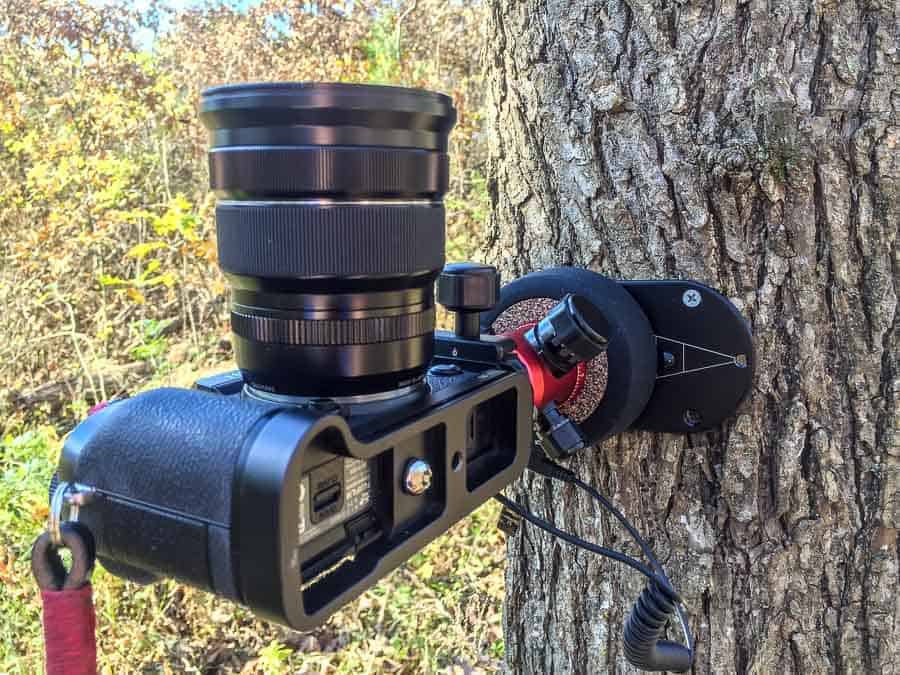
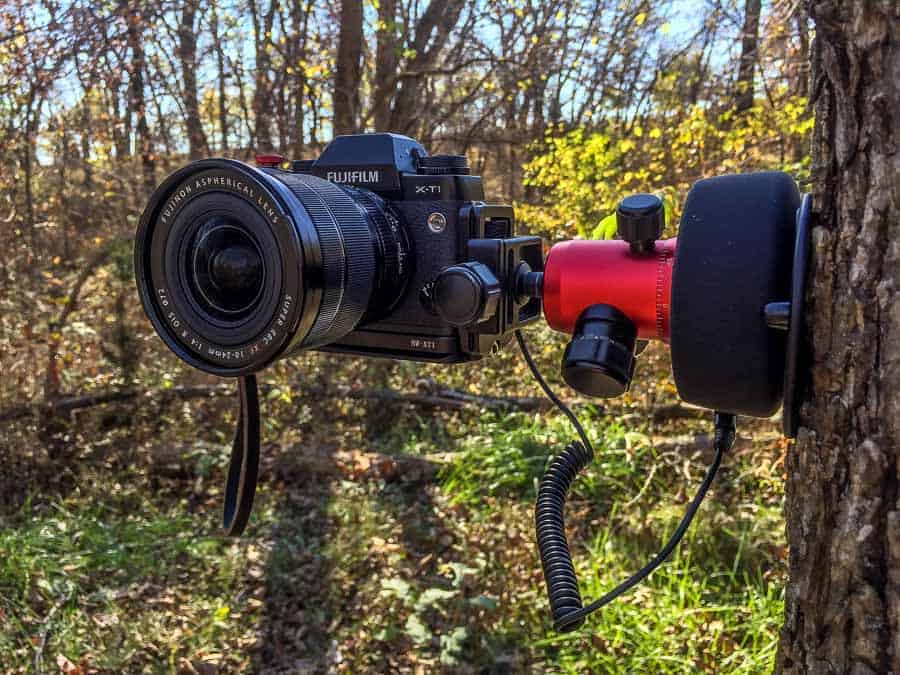
In the Woods
I wanted to try something different with this time lapse. The Platypod Pro base plate was mounted vertically by attaching it to a tree. The Genie Mini was ballhead were attached and the camera was connected using an L-bracket. This allowed a vertical panning motion for a different look. The video consists of 2,526 photos, shot at 2.5 second intervals. I doubled the speed in Photoshop (from 24 fps) because it was just too slow. There wasn't much action in the frames, but you get the idea. This orientation could be used in a variety of creative ways.
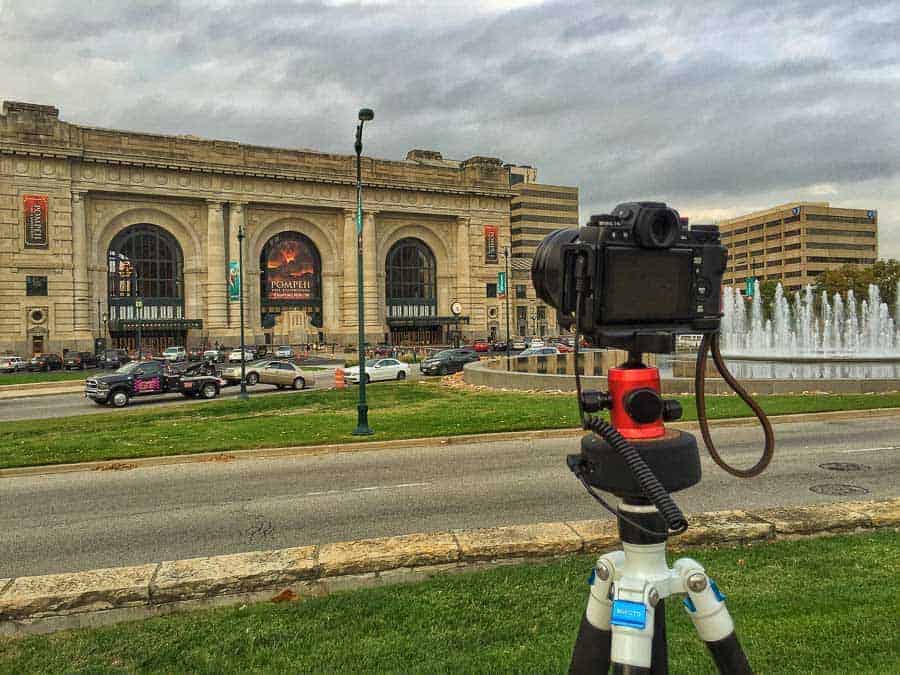
Union Station
I wanted to try some traffic movement, so set this one up across from Union Station in Kansas City, Missouri. This was a standard set up on a tripod, consisting of 1,441 images shot at a 3.5 second interval. I really thought the clouds were going to break and give me some nice color in the sky, but it didn't happen. There was a brief rainbow, however, starting at about the 0:48 mark.
Kansas City Skyline
Night time lapses can be difficult, especially when starting right after sunset and the light is quickly changing until it gets dark. This time lapse of the city skyline with traffic is made up of 1,444 images, shot at 3.5 second intervals. I noticed quite a bit of shakiness during the time lapse. This may be due partly because it was a windy night and I was using a small and light tripod. Part of the problem may also be that I touched the camera periodically to manually ramp the exposure.
Panorama
The panorama feature seems to work well on the Genie Mini. The image below is a stitch of 6 separate images, shot in portrait orientation, with 40% overlap. The images were stitched using Lightroom's Photo Merge – Panorama feature.

Other Syrp Products
The Genie Mini is one of many motion control products that Syrp offers. Two Genie Minis can be used together with the pan/tilt bracket for 2-axis motion control. Genie Mini's big brother, the Genie, is similar in that it does time lapse and video with a panning motion. It can also be set up for linear motion along along their Magic Carpet or even your own DIY track. Other more advanced features are also available, such as bulb ramping and auto start. The Genie and Genie Mini can be connected using a sync cable to provide 2-axis motion control. Connecting the Genie and two Genie Minis provide 3-axis control. Another new product, the Sling Shot, can be used for time lapse or video panning over longer distances. It essentially consists of a cable and pulley system that can be used with the Genie and Genie Mini to transport your camera up to 100 meters.
As you can see, there are lots of possibilities with these products. Motion control products have historically been extremely expensive and cumbersome to use. Syrp has made products that are portable and much more easily attainable for not only professional photographers, but also hobbyists as well.
Wrap Up
The Syrp Genie Mini is a unique device that gives photographers the option of using motion control just about anywhere. It is extremely portable, so it can be readily carried in a backpack or camera bag. It also seems to be very well built, at least based on my observations so far. One concern I do have is the durability of the cork material over time, especially as it is routinely screwed on and off a tripod. Although there was a small learning curve, the device was pretty easy to use straight out of the box. The video tutorials in the app and on the Syrp website are very helpful for learning the different settings and features. The free app is very intuitive and easy to use with the Genie Mini. There were early reports of the app crashing during use, but I didn't experience that. I suspect that firmware updates have continued to work out the bugs.
The Genie Mini is not inexpensive, and is not something that would be a useful tool for every photographer. For anyone who does a lot of time lapse shooting, I think the Genie Mini would be a great tool to add to the camera kit. I really enjoy creating time lapse videos, and believe that the Genie Mini greatly improves their production value.
I very seldom use the video feature on any of my cameras. It's just something I haven't taken the time to really learn, but probably should. The video feature on the Genie Mini works well and enables you to make really smooth panning movements.
Shooting panoramas on the Genie Mini is pretty straightforward, but takes some time to set up. For me personally, I shoot most panorama images hand-held and would not likely use the Genie Mini for this feature. The exception would be if shooting in low-light conditions where shutter speeds are too slow to hand hold the camera or on the rare occasion that I would want to shoot bracketed images to stitch together.
Final Word
The Syrp Genie Mini is a niche product that is going to be most appealing to those who do time lapse or shoot video. In my opinion, the ability to shoot panorama images is a nice addition, but probably not something I would use a lot. But then again, I don't shoot a lot of panoramic images. I would recommend the Genie Mini for anyone who wants to take their time lapse videos to the next level or increase the production value of their videos.
& with a slider & a bit of paracord you can DIY some horizontal movement 😉
With panning https://www.youtube.com/watch?v=3kLS0CyvjYA
Without panning: https://www.youtube.com/watch?v=SW-6iLcI0O8