
Deciding which website platform to use to host your photography portfolio can be a tough decision. Once you add an online store into the mix, the process can become even more complicated. About a year and a half ago, I was given a one year subscription to a Squarespace account as a gift so that my photos would finally have a home on the internet. After building a portfolio using Squarespace, I eventually decided to start selling prints of my photos and dove into using the Squarespace Commerce platform to do so. My online store has now been active for about six months, and I wanted to share my experience with using the platform to sell photographic prints. This tutorial will focus mainly on selling photographic prints from a Squarespace site; however, many of the information below will be helpful in selling digital downloads or other photographic services via the platform as well.
[x_alert heading=”Important Note” type=”success”]Squarespace advertises on the Improve Photography Podcast, but did not pay us to create this content nor ask for it to be created. We're only writing this helpful tutorial because many photographers–like us–use Squarespace for their photography portfolios. If you are interested in giving Squarespace a try, use offer code “IMPROVE” when signing up to get 10% off. [/x_alert]
Background
Since I already had a website designed using Squarespace, I decided to give it a try as an online store to see if it fit my needs before looking for other options. There are many other options out there—such as Zenfolio, SmugMug, PhotoShelter, Fine Art America, and more—each of them offering different strengths and weaknesses depending on your needs when it comes to selling your photography. Many of these are specific to photography, so their functionality is tailor-made for photographers to sell their work. Squarespace, on the other hand, designed their sites to sell both products and services, but did not necessarily design their Commerce platform with photographers in mind. Therefore, it is important to note that if you are looking to sell photographic prints on Squarespace, you won’t find any third-party lab integration like you would with SmugMug or Zenfolio.
Because Squarespace does not offer third-party lab integration, I had to accept before building my store that while Squarespace would be able to display my store, take orders, and bill customers, it would be up to me to work with a lab on my own to fulfill those orders. Before writing this article, I reached out to Squarespace to see if there was an easier way for me to sell my landscape prints than how I was currently using the Squarespace Commerce platform. The response I got said that fulfilling orders through a lab on my own was the easiest process for now, and even went as far as suggesting that the next best way to go would be to link my Squarespace website to another store function such as Zenfolio or Gumroad. They did mention, however, that they were looking into providing third-party lab integration in a future version of Squarespace.
Types of Squarespace Commerce Accounts
The types of plans available through Squarespace for online stores are different than when I signed up for mine. As of this writing, Squarespace offers two “Online Stores” plans listed as “Basic,” which costs $312 per year when paid in full or $30 per month when paying month to month, which totals $360 over the course of a year. The second option, the “Advanced” plan, costs $480 per year when paid in full, and $46 per month when paying month to month, which totals $552 over the course of a year. This Squarespace website lists the only extra features in the Advanced plan as “Abandoned Checkout Autorecovery” and “Real Time Carrier Shipping.”
If these online stores are too pricey for your liking, Squarespace also offers two “Websites” plans which also feature integrated Commerce functionality, allowing you to sell unlimited products in your store. However, these plans do no include analytics related to your online store, and they also come with transaction fees. As of this writing, the two “Websites” plans are listed as “Personal”, which costs $144 per year when paid in full or $16 per month when paying month to month, which totals $196 over the course of the year. The “Personal” plan comes with 3% transaction fees. The second option, the “Business” plan, costs $216 when paid in full and $26 per month when paid month to month, which totals $312 per year. The “Business” plan comes with 2% transaction fees and also does not include commerce analytics like the “Online Stores” plans do. Depending on how many prints you plan on selling, it may make more financial sense to start off with a cheaper plan with transaction fees and upgrade when you begin selling enough that they cut into your profits.
The Ordering and Fulfillment Process
Since I’m a perfectionist and a control freak, I was fine with the idea of having to coordinate through a print lab on my own to fulfill orders. With that said, for me to deliver a photographic print to a customer that buys through Squarespace, this is how the process typically goes:
- A customer orders through Squarespace Commerce, which then sends me an email indicating that I’ve received a new order. Squarespace also has a mobile app for their Commerce platform, so I also receive a notification on my phone that an order has been made. An email is automatically sent to the customer confirming that their order has been placed.
- Billing is carried out by Stripe, which integrates for free with Squarespace. Stripe takes a 2.9% + $0.30 fee for each transaction.
- Depending upon what type of print is purchased, I use either Nations Photo Lab (paper prints and canvas wraps) or Bay Photo Lab (metal prints) to fulfill print orders. For paper prints, since I have already had test prints made for every photo I sell, fulfilling an order simply involves placing an order and copy and pasting the customer’s information from Squarespace into the lab software so that Nations knows where the print should be drop shipped. For canvas or metal, since test prints are more costly to produce, I check test prints when each photo is ordered for the first time, first buying a 4×6” test print to confirm that the print looks good in terms of color and exposure, and then ordering the final product to be shipped to the customer after I have approved of the print.
- Once I receive a shipping confirmation, I use Squarespace to send an automated email to the customer indicating that the order has been fulfilled and provide the shipping tracking number so that the customer can see when the print will arrive.
Creating a Store

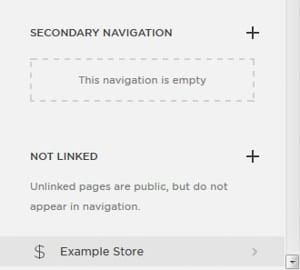
Creating a store page in Squarespace is as simple as going to the “Not Linked’ section of your Pages toolbar and clicking the “+”symbol. This will bring up a box which allows you to name your store, add a description of it, edit the URL, enable or disable the store, and password protect the page so that it cannot be accessed until you are ready to launch. Keeping the store in the “Not Linked” section for now keeps the store out of your website's navigation bar. In this case, I’ll call my store “Example Store” and make sure it is disabled. Once you are ready, click “Save” and your store page will be created. Keep in mind that Squarespace has many different design templates, so while the Commerce functionality should be the same, the layout may be different if the template you use is different than mine.
Adding Products to Your Store
 Once your store is created, it’s time to add products. When I sell my photography, I considered each different photo to be its own product, which can then be sold in varying sizes and on different print surfaces within that “product.” For example, if I chose a make a photo of a Boston sunset one of my products, I can make various options for the customer to chose when they visit that product page, such as a 12×18” print on metal or a 20×30” print on paper. To create a product, open up your store by clicking on its title in the toolbar on the left of the screen and click the “+” symbol in the top right corner. For physical prints, select the “Physical” option. There are also product options for digital products (ex. high resolution downloads of photos) and services (ex. portrait shoot).
Customizing a Product
Once you create a product, you need to do some work to input the information your customers will need to buy your photo. This includes the name of the product, pricing details, variations of the product (ex. different sizes or print surfaces), and more.

Item Tab
In the Item tab, you have the ability to input the main information that pertains to your product. For the product name, I enter the name I’ve chosen for my photo, making sure it matches the name listed elsewhere on my website for that same photo. In the image upload box, you obviously want to upload the image you want to sell. In the Tags and Category sections below, I will put any pertinent keywords I can think of that might apply to the photo so that they can be found easily. I limit the Category section to only one or two main entries, choosing something broad like “Night” or “Massachusetts” depending on the defining characteristics of the photo. The categories you chose will be based entirely on how you decide to organize the different photos in your store.
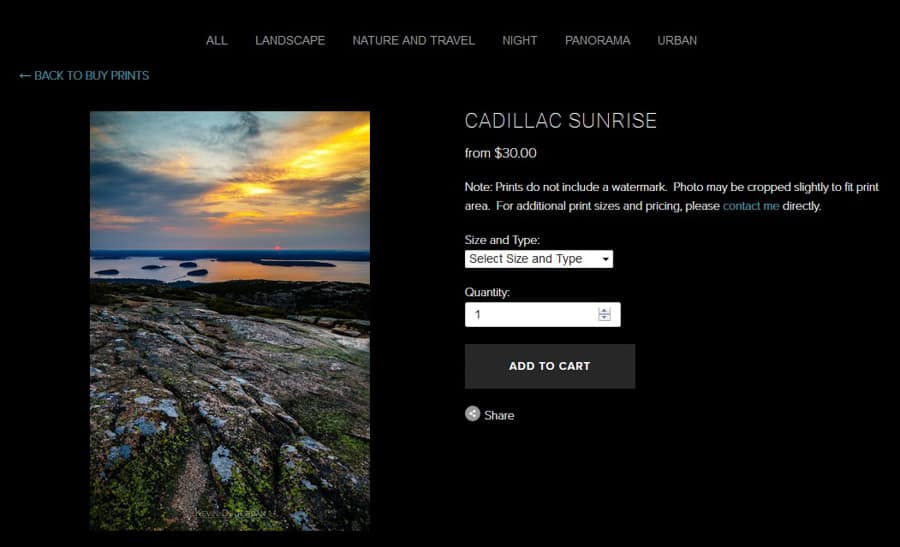
The description box in the lower right hand side of the Item tab is up to you. I personally add important notes that I want displayed directly next to the image in my store, such as that the physical print the customer receives will not include the watermark shown on my website, and that they should contact me directly if there are any sizes they would like that are not automatically displayed. If someone wants a bigger print than you decided to list on your website, you want to make sure you have in a prominent spot that they can contact you directly so that you can make their photographic print dreams come true. Don't not miss out on a potentially big sale because important information isn't listed in an easy-to-find place in your store.
Pricing and Variants Tab
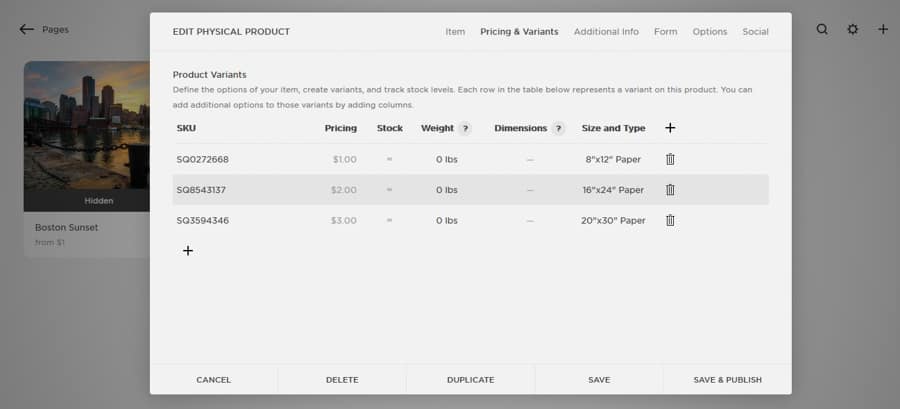
The Pricing and Variants tab in the product menu is the go-to spot for you to set the cost of each size and type of your print. For my photos, I decided in advance what print surfaces I wanted to offer (lustre paper, canvas wraps, and metal prints), which sizes, and what the prices would be for each. The default columns that show up by default in this menu are SKU, which shows the item number for your product; Pricing; Stock; Weight; and Dimensions.
You are able to change the SKU item numbers for each product variation you choose, but that seemed like more trouble than it was worth for me, so I allowed them to be randomly generated when building my website store. The Pricing column simply requires you to input the price for any item. For stock, you can either input a specific number of photos you plan to sell, or set it to infinity. You may want to choose a specific number if you have a certain number of prints lying around the house or office that you consider to be your stock. This may also be helpful if you have deemed your photo to be a special edition and want to limit the number that go out into the world.
The Weight and Dimensions columns only matter if you plan to calculate your shipping costs based on weight of the item you are selling. If you do, input the estimate size and weight of each item so that Squarespace can help calculate shipping costs during a customer’s order. If you plan to fulfill orders by drop shipping them directly from the lab like I do, you will have to consult your chosen lab’s shipping costs and policies and create a custom shipping option, which we will discuss later.
Beyond the default options which appear in the Pricing and Variants tab, you can click the “+” icon to add additional columns. For my store, I added a Size and Type column where I include the different combinations of standard sizes and print surfaces I want to offer. For example, in this column I list items such as an 8”x12” Paper Print, 12”x18” Paper Print, 12”x18” Canvas Wrap, 12”x18” Metal Print, and so on. After filling in a few of the necessary columns in the Pricing and Variants tab, my options look something like this:
Additional Information
The next tab in the product creation menu is a space for additional information. I use this space to give detailed descriptions of the types of photos I offer in my store, including traditional paper prints, canvas gallery wraps, and metal prints. I also include estimated production times for each type of print to set an expectation of approximately how long it will take before the customer receives a photo.
Forms
The next tab in the product menu is called Forms, and is used to give the purchaser an option of adding custom information to the order. For example, if I wanted to give the customer the option of adding a message on the back of the print in the event it is a gift, a form could be used to allow the customer to input what the message should be. I currently do not use any forms for my site.
Options
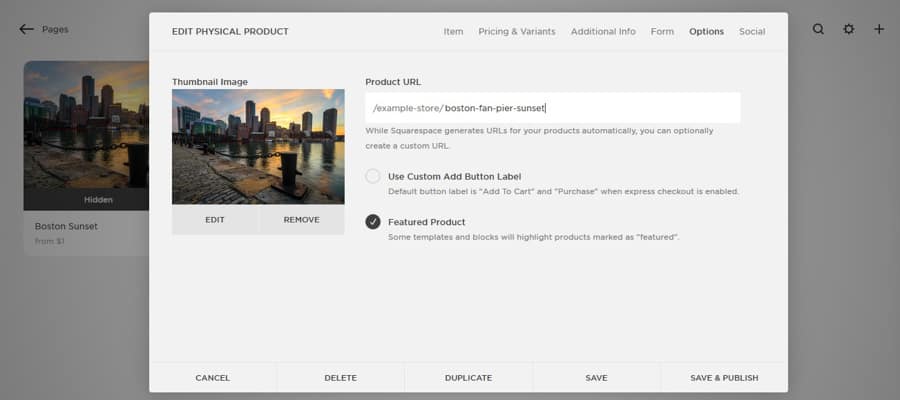
The Options tab in the product menu offers several additional choices for additional information, including uploading a photo thumbnail, which I always do, and adding a custom URL. I always edit my URLs to be descriptive and similar to my photo name. For example, for a photo of the sunrise from a specific area of Boston, I might make the ending to my URL something like “/boston-fan-pier-sunset”. The Options tab also gives you the ability to mark a photo as a featured product on your store.
Social
This is the last tab in the product menu, and allows you to post automatically to social media when you post a new item to your store.
Once you finish setting all of the options in your product menu, be sure to go back to the Items tab and, when you are ready, change your product from “Hidden” to “Visible”, or schedule a time for it to go live in your store. Also keep in mind that if you have additional products to post in your store that are similar to the one you just created, you can click “Duplicate” to create a new product that has many of the options you just input, thereby saving you time when adding multiple products to a store.
Commerce Settings
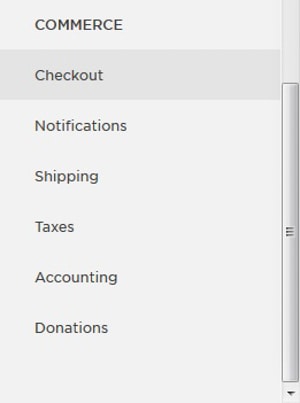
Once you have created and customized products in your store, you still need to take a few behind-the-scenes steps to make your store functional. In the menu on the left side of your Squarespace page, choose Settings and scroll down to the Commerce section. You should see six options: Checkout, Notification, Shipping, Taxes, Accounting, and Donations. We’ll focus on the first four since they are pertinent to getting your store functioning properly.
Checkout
 The Checkout menu is arguably the most important one when it comes to getting your store up and running. Within the menu is where you click the button to make your store go live when you decide you are ready. In addition, this menu is where you can connect your free Stripe account (which integrates with Squarespace and handles your monetary transactions), choose your next order number (I chose not to start my order numbers at 00001 so people didn’t feel wary that they were one of the first few orders), enable express checkout, collect email address for newsletters (Squarespace integrates with MailChimp), and edit your store policies. Of these options, I chose to spend special focus on my store policies, which detail my return policy. Be sure to give special thought to these policies before you start selling products and consider how certain policies will affect your potential customer satisfaction, the amount of time it could potential take you to satisfy an order if it is returned, costs you might incur, and your own liability when it comes to a sale.
Notifications
The Notifications menu allows you to customize the messages your customers will receive when they order a product. You can edit the emails sent for order confirmations, order fulfillments, and refunded orders, as well as the headers and footers that go in each of these emails. I found this process to be a bit more confusing than I would have liked. Since I felt that the default messages looked fine, I did not do any customization to the notification emails in my store.
Shipping
As I mentioned above, Squarespace can handle shipping options in a few different ways. The two main ways are Flat Rate and Depending on Weight. I use a flat rate for my shipping option because Nations Photo Lab uses a flat rate shipping for all sizes of paper prints. Therefore, I make a “Standard Shipping” option that matches what the lab charges. Alternatively, you can set weight ranges that correspond to certain shipping prices so that your customer’s shipping cost will be determined by the total weight of the products they purchase. Further, if you choose the “Advanced” plan when purchasing your Squarespace account, you can get shipping estimates directly from FedEx and UPS.
Taxes
The dreaded Taxes section is where you can set which taxes you collect when selling a product. For me, this is simply sales tax in the state where I reside, so I collect sales tax for each order that will be shipped to a customer in my home state. For more info on how to determine which taxes to collect, check out Jim Harmer’s Simply Guide to Setting Up A Photography Business Legally and consult a tax advisor in your area.
Managing Orders
Managing your orders can be done by signing into Squarespace on your computer or by using the Squarespace Commerce mobile app. In each case, you can manage your orders and inventory. When on a computer, you can also manage discounts and coupon codes for your store, as well as payment history, which includes payments, refunds, failures, and chargebacks.
Orders
The Orders menu is an important place to familiarize yourself with because it shows a history of your orders, their current status, and detailed order summaries. When I want to fulfill a purchase by ordering a customer’s print through my lab, this is the page I go to to find their shipping information, which prints they purchased, and more. You can also change the status of an order from this menu, thereby marking purchases as fulfilled, cancelled, or refunded.
Inventory
The Inventory menu is not one that I use often since I consider all of the products I sell to have an unlimited inventory. However, if you do choose to offer only a certain amount of each print, this menu will give you an excellent summary of how many of each product and in each variation remain in your inventory at any given time.

Final Thoughts
So far, I have been happy with the experience of using Squarespace Commerce to sell my photos. While the Commerce platform is certainly not optimized for use by photographers, once it is set up the website store runs very smoothly, and the process for me has been pretty painless. With that said, however, I have only had to fulfill a handful of orders through my website each month so far, so my process of receiving and order and subsequently requesting that print from my lab has not been too much of a burden. If my online print sales were to significantly increase, I could see myself wanting to move on to an option that provided automated fulfillment through a third-party print lab.
If you are interested in giving Squarespace a try, use offer code “IMPROVE” when signing up to save 10%. If you are interested in taking a look at a finished online store powered by Squarespace Commerce, head over my print store at www.kevindjordan.com/buyprints to see how you like the functionality. And, if you have any troubles getting your store up and running, don’t hesitate to send a message over to Squarespace customer service, which I have had a very good experience with so far.
Thanks for this article, Kevin. I have yet to jump into Squarespace Commerce. Right now, I just have the Basic plan, which I believe only allows for one item in your store. I haven’t decided if I want to invest more money to upgrade. Not sure if I would make enough print sales to make it worthwhile. Have to give it more thought, but your article is really helpful.
Thanks, Rusty. See Tracy’s comment below. Looks like they have upgrade the pricing structure to allow all sites to have the Commerce function. The difference is just that the cheaper plans have transaction fees and don’t have Commerce analytics. If you have Google Analytics attached to your site, however, that may not matter. Seems like it’s easier to give it a try now!
You can now have unlimited items in your store, even on the basic plan – they just take 3 percent commission from your sales. Makes it a little cheaper ($12/month) for someone starting out. https://www.squarespace.com/pricing/#websites
Thanks, Tracy. I didn’t realize they had updated that part of the pricing structure as well. Looks like its easier to get started now so long as you don’t mind the transaction fees.
Hi Kevin,
Thanks for this article! I have been looking to make the jump away from photoshelter for a few reasons like lack of integrated blog, no extra pages, lack of ease selling services or other products other than prints, and high transaction fees (9% plus PayPal fees). One of the things that keeps me from square space is that I don’t see anyway to make generic pricing profiles for prints and then just apply them to an image I choose. I have at least 200 images on my site and the idea of having to go set all the options for each one sounds exhausting. Any suggestions on this? Is there a feature that I am missing like that? Thanks!
Hi Charlie,
I had the same issue and solved it by creating templates. The templates remain hidden and all I have to do is duplicate the template, change the name to the name of the photo, drop in a thumbnail of the photo, select the category, and make it visible. I have four templates based on the aspect ratios of my images. I am waiting for samples from different labs. When I make my decision on which labs I am going to use I will go live with my store. Hope this helps.
But what if your price changes? or you want to add a new print type like glass or wood? On a photoshelter or morephoto site you go to a price list and add it or change the cost. If you have 200 images that all need to be updated that is going to take a while going to each item.
Thank you for the great article. I have been using Smugmug for everything, not really loving it anything, but getting by. Impossible to do proofing, blog is bad and it looks different on desktop vs mobile with little customization on ugly templates. I’ve always wanted to switch to Squarespace, but up until recently with the change to unlimited storage and unlimited items you can sell with the basic plan, it wasn’t really an affordable move for me. Now it looks like the best of all worlds. I am still at a point in my photography where my clients are wanting digital downloads and I was wondering how easy/difficult that would be to add that option in a gallery? Does the store have to be completely separate from the client’s gallery? How feasible is it to add something like a “buy print” option for a wedding? Would one have to replicate what you did for your landscape photos hundreds of times for each individual photo from one wedding, or could you set a standard for every photo you upload? Apologies for the long comment with many questions, but appreciation for the article and any advice you could give me. Thank you.
Thank you Kevin,
This article is exactly what I need to get my store started. I have sent for samples from a few labs and will go live as soon as I make my decision on witch one or two to use.
Thank you so much Kevin. Your article was a life saver and your website is amazing. As Andrew mentioned above, I am also having trouble linking my gallery directly to my store. Any suggestions would be appreciated. Ellen
Would it not be easier and more professional if you use a system built to sell photos like morephotos.com ?
Their blog interface is the pits. I dropped morephotos for their lack on integration.
Is there away to apply it a little differently in Squarespace. Here’s my problem. I/m a Motorsports photographer that often shoots track days where people can take their bike or car onto the track, race it and so on. I take photos and people can visit my site to buy those photos.
Currency my main website is running on squarespace, but that’s just my portfolio. I use Smugmug to sell. There, I can set up a price-list which would include: Downloads, Prints (Various sizes) and then the cart takes customer details and full files the order.
This set up is messy. I’d rather my shop live inside my main squarespace website. But rather set up each photo as a product, can i set up the type of sale as a product?
A day’s shoot for me will leave me with about 600 images for sale. And each new track day will bring new images. I need my products to be:
Downloads
Prints
Print size
Paper type
etc
And attach those opens to each image I upload.
Is there anyway of doing this? this is driving me banana’s 🙁
Dave.
Dave, what did you work out for your motorsport photography needs? I’m in a similar situation with upcoming skiing events this winter (I’ll have hundred of photos each day of the event) and I’m wondering how best to get these images to the skiers/parents/sponsors, etc. to purchase what they want online. ANY advice or experience of yours is greatly appreciated!
Nice article. Based on what you wrote this is quite good for somebody who does not sell tons of prints, which is me 🙂 I find the hardest part to be shipping costs. I believe flat rate is only available within US. Am I correct? It is really hard to maintain up to date international shipping costs for x number of countries, different package sizes and different shipping companies. From this point of view SmugMug or Fotomoto or similar services would make a sense but they shave your profit margin by transaction fees and subscriptions.
I agree with Dave. I need the capability of uploading a gallery, and selling all….but not creating a product for each….
Any luck working this out, Kimberly? I’m in need of the same thing.
Hi Kevin!
Super helpful article. I was wondering how would you handle the payment collection for an international order or if the customer wanted addition sizes not listed within your store?
Thanks!
I use Squarespace, and really love the customer support also. I don’t sell a lot of prints, but cards do well. I got around the “adding every item” by setting up photo cards, and then prints just by size. A pop up form appears and the customer then adds in the name of the print from the photo card page. To get around the shipping issue I just included it in the price. Seems to work for me. I then use a lab for direct ship to the customer.
http://www.pathcontinues.net
I’m Currently looking into setting up a website with square space and selling prints, Id probably start with the second cheapest package and upgrade as I progress, Now i’m new to the whole selling prints and seems to be the best way to ‘get my self out there’ whilst I am travelling.
My question is when watermarking photos and someone purchases a print how does the print arrive to them without the watermark?
Also does anyone know how easy it is to say find a printing lab in Australia and work with them and then when i go to new Zealand can I find another one and use them or… As i am from England and most of my purchases I think will come from there at first am I best to find a printing lab in England (as i am planning to travel the world pretty much), is there a way to add a country option on my website so if someone from Australia wants to purchase they can click Australia and it will change pricing from pounds to Dollars?
Thank you for this article. This is what I was looking for. I think this is going to help me with my photography hobby and hopefully make a little extra money.