
Some of the most beautiful places on earth are encapsulated in the National Parks of the United States, lending themselves to some of the most recognizable and amazing photographs of these wild spaces. Although it may not be one of the more well-known, Capitol Reef National Park, in Utah, is one such place of immersive beauty. Within its deep canyons, massive rock formations, and complex geological history, lies a veritable treasure trove for would-be explorers, adventure-seekers, and photographers.
There are a total of 59 areas designated as national parks in the United States and US territories. With a total of 5 national parks, the State of Utah ranks third, behind only California (9 national parks) and Alaska (8 national parks). Capitol Reef, located in south-central Utah, was established as a national park in 1971. It ranked 24th among all national parks, with just under one million visitors in 2015.
With over 240,000 acres, there is a LOT of ground to cover in Capitol Reef National Park. I recently spent 5 days there, dedicated to photography, and feel that I was barely able to scratch the surface. There are so many things to do and see, and to photograph in the park. This article will cover the highlights of my time spent in the area and will hopefully help you to plan your own trip to this incredible place.
IMPORTANT TIP! Since publishing this article, we created the ULTIMATE tool for planning a photography trip to Capitol Reef. It's called Really Good Photo Spots. It's a free iPhone and iPad app with THOUSANDS of the best photo locations in the world all in one app. Nearly every country in the world has many spots, and southern Utah is especially well-covered. It's really convenient for travel photography because you can just tap “Spots near me” and BOOM! It lists all the best spots to take pictures near you. Download really Good Photo Spots for the iPhone or iPad right here.
When to Go
Capitol Reef is a characteristic arid climate, receiving less than 8 inches of precipitation annually. The winter months can be quite cold and the summer months of July and August stiflingly hot. The best times to visit are generally early spring or late fall. Not only are the temperatures more mild during these months, there will be fewer people in the park since these times are not during the height of tourism season. That can be a good thing for landscape photography.
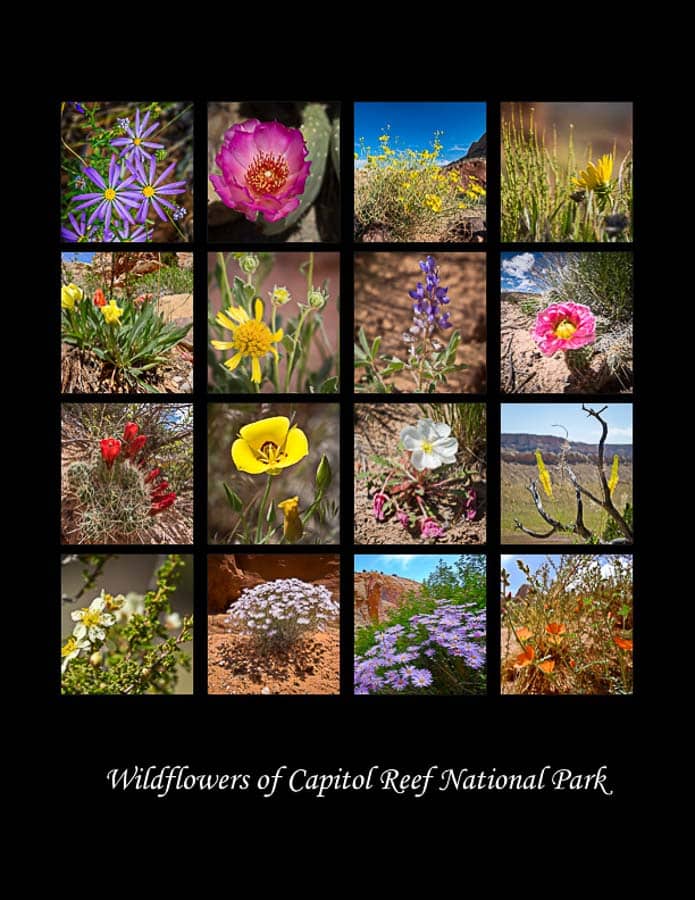
Another thing to note is that wildflowers abound in the area during the months of May and June. This can provide some great opportunities for macro photography, but also are well-suited, colorful foreground subjects for landscape images.
How to Get There

It has been said that Capitol Reef is one of the ‘best kept secrets' in the national park system. This may be debatable as evidenced by the nearly 1 million visitors last year. Perhaps the park is being found by more and more tourists, but the fact remains that it is off the beaten path. The park is at least an hour away from an interstate highway, and further still from any sizeable urban area. Driving from either the east or west will mean that you will likely be on Interstate 70, and exiting onto Highway 24, which leads directly into the park. Traveling from the north or south, you will likely be on Interstate 15, exiting onto either Highway 20 (northbound) or Highway 50 (southbound), and making your way to Highway 24. If you fly in, you will most likely be arriving in Salt Lake City, approximately four hours north of the park, and driving south on Interstate 15.
If you plan an overnight stay, the best options for lodging in the area are in or near the small town of Torrey, approximately 10 miles west of the park entrance.
What to Take
For my trip to Capitol Reef, I was driving alone and had plenty of space to take everything needed, plus a whole bunch of other things that I didn't need. If you are flying, or otherwise limited on space, you may not have that option. Obviously, you will want your camera. It doesn't really matter if your camera is a crop sensor or full frame, DSLR or mirrorless. You can make great images, regardless. If you have a second camera body, bring it along as a backup, just in case. You may not need it, but it's nice to have the assurance that it is there. If you have a smartphone, don't forget that you also have a fairly capable camera right in your pocket most of the time. I like using my iPhone for behind-the-scenes shots or an occasional video.
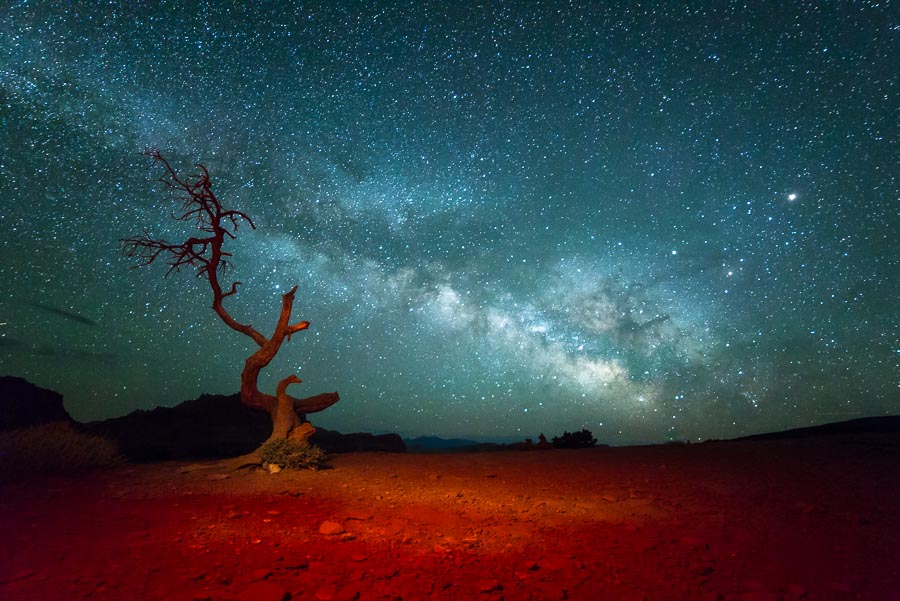
Since you will be shooting landscape images, bring along some lenses that will be well-suited. Being able to cover the focal range from something wide (i.e. 16 mm, or equivalent) up to about 200 mm would be ideal, either with one or several lenses. Keep in mind that you don't have to have ‘fast' lenses capable of wide aperture settings for landscape photography, since you will be shooting at f/8 or even f/11 much of the time anyway. However, if you plan to do some star trails or Milky Way images, it would be helpful to have a lens with a maximum aperture of f/2.8 or faster. Other options to consider are a macro lens or extension tubes for the wildflowers or other close-up shots and a super-telephoto lens for wildlife.
Other equipment you will need will be a good, sturdy tripod to provide support for images made during the low-light hours at sunrise and sunset (or at night). Also, consider bringing a polarizing filter and neutral density filter. A polarizer can help cut through haze and reduce glare in certain situations. The neutral density filter may be used for more creative effects, such as dragging the shutter to show motion in moving water or clouds.
Finally, don't forget something to carry your gear with you. Most of the shooting locations will require some hiking, so a comfortable backpack to carry an extra lens or two, filters, water, and snacks is a great idea.
Where to Shoot
Photography locations will be broken into two main categories: those areas that are within the park boundaries and areas that are just a short drive away from the park. This map shows a general overview of the park and the surrounding areas. When photographing landscapes, the best light is typically in the morning just before and after sunrise and in the evening an hour or so leading up to sunset until 30 to 45 minutes after the sun dips below the horizon. These are just general guidelines, and there will be exceptions. Deep canyons are going to be better at mid-day, when the sun is more overhead to penetrate and light up the canyon walls. On cloudy days, the light will be even throughout the day, providing very little definition to the scene. Days like these may be better for doing some macro photography, if there is not a lot of wind. Of course, there is always the option to switch your camera to a black and white shooting mode to see if the different tones and areas of contrast can create more dramatic imagery. In other words, if bad is the light, switch to black and white…:)
Photography Locations in Capitol Reef
Hickman Bridge
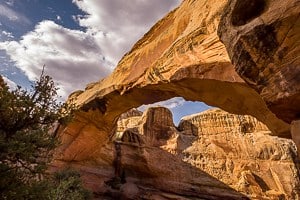
Hickman Bridge is an approximate 2-mile round-trip hike to a 133-foot natural bridge. This is a moderate intensity hike that can easily be done in 2 to 4 hours, depending on your pace and amount of time photographing along the way. It offers nice views of the canyon as well as the light-gray sandstone dome formations from which the park got its name. Depending on time of year, you may have a variety of wildflowers to photograph, too. It is a popular spot, so plan on having lots of company in the parking lot and on the trail. It is definitely worth the effort, though, and easily accessible from the main highway through the park.
I did this hike in the evening, reaching the bridge a couple of hours before sunset. The low evening sun lit up the back side of the stone bridge with a nice golden-orange light that contrasted nicely with the blue sky with puffy white clouds. The reflection of light off the adjacent wall partially lit the underside of the bridge as well. The timing was good, because much later and the sun would have been down below the rock formations to the west, leaving the bridge in deep shadow.
Panorama Point
Panorama Point is one of the first turn-outs you will see coming into the park from the town of Torrey to the west. As the name implies, this location provides nice panoramic views of the park as well as the Henry Mountains to the southeast. This is an easily accessible area, located right off the highway, and requires little to no hiking to get a great view. There is lots of space to move around, so even during busy times, you can find your own place to set up for some nice photos.
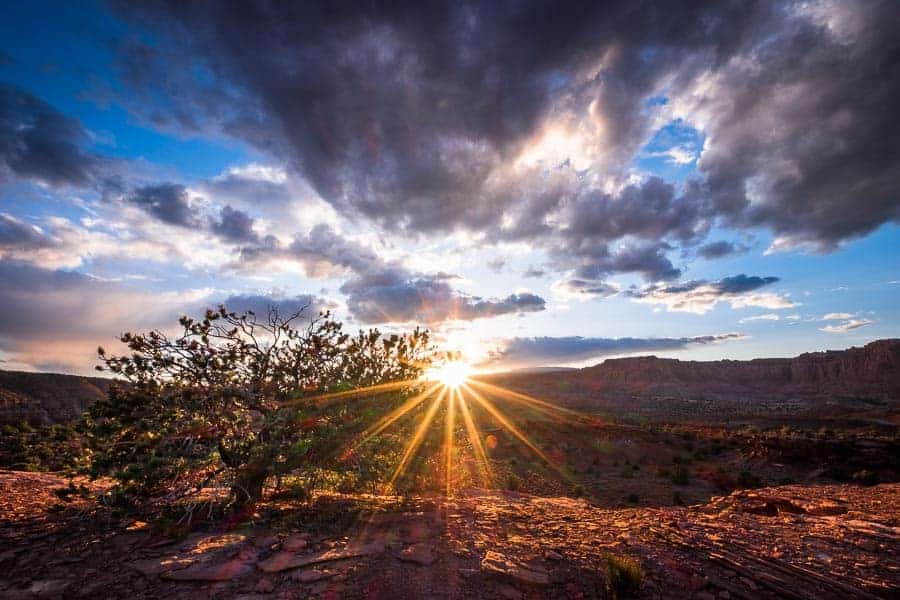
This spot is best at sunset, as the rocks to the east light up and reflect the golden sun. You can also shoot toward the west, strategically placing the sun behind one of the many Juniper trees or at the edge of a rock to create some nice starburst images. The week that I was in the park, there were few opportunities for a good sunset. Although each day was mostly clear, clouds seemed to move in just in time to block the western horizon. The one evening that was favorable still had a lot of clouds, so the sunset and colors weren't great, but still not a bad way to end the day.
As a bonus, this is also a fantastic location for some late night star trails or Milky Way photography. So, shoot the sunset, then stick around for some amazingly dark skies (providing that the moon phase cooperates). The really nice thing is that your car will be relatively close by, so that not much hiking will be necessary.
The Scenic Drive
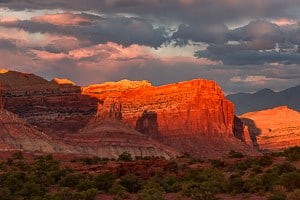
OK, so technically this isn't a shooting location. Rather, it's a route to take through the park where there are lots of pull-outs and offers lots of photographic opportunities. The Scenic Drive is an approximate 8 mile route that runs to the south from the visitor center. After paying the $10 park fee, follow the paved road as it takes you back into geologic time. You will see tilted rock layers that compose the Waterpocket Fold, a literal wrinkle in the earth's crust caused by upheaval of this geological “layer cake”. Unique rock features include the rounded domes of Navajo Sandstone, the colorful Moenkopi and Chinle Formations, and unusual erosional patterns of the Wingate Sandstone. The rich colors and unique textures and lines that are present can provide some interesting photographic opportunities.
The paved road eventually ends at a fork in the road, with the option to travel gravel/dirt roads either to Pleasant Creek, which is further south, or Capitol Gorge, which is to the east. You can make some great detail images of the rocks and wildflowers along the route, or include them as part of a landscape image. While there are opportunities for photography any time of day along this route, the best landscape images will likely be at sunset, when the tilted rock formations reflect the warm light of the evening sun. If you're lucky, there will also be a few clouds in the sky to really add some visual interest and make your images really stand out.

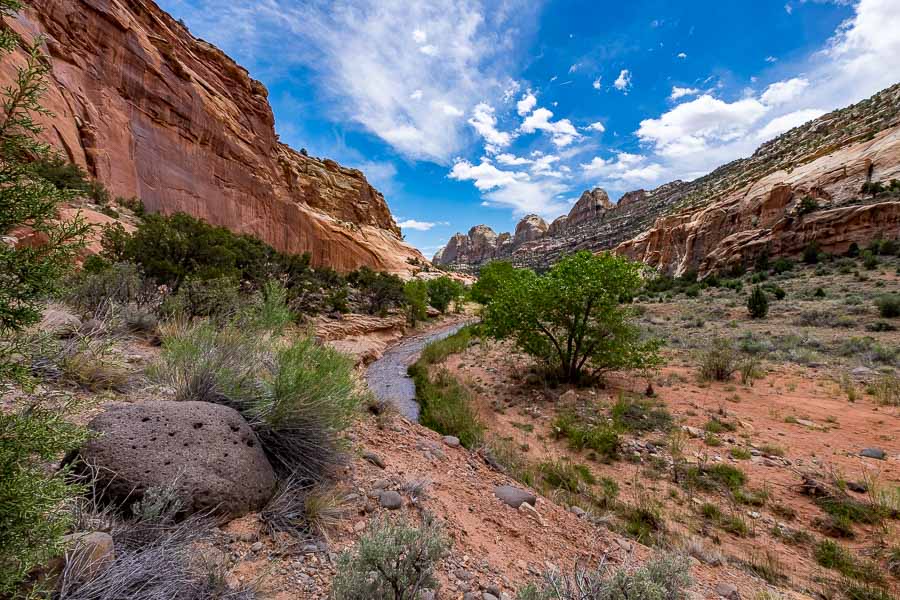
Grand Wash
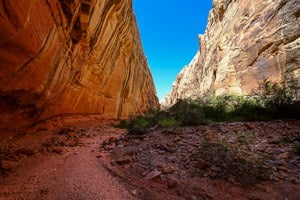
There are a number of day hikes throughout the park, of varying lengths and difficulty. Grand Wash is an easy hike, and is easily accessible at each end from the main highways through the park. This can be a 2.2 mile through-hike if you can park a vehicle at each end, or a 4.4 mile round trip. The Grand Wash hike passes through deep canyons, offering stunning views of the sheer rock formations overhead. The best times for this hike are mid- to late-morning or late afternoon, allowing for the canyon walls to be lit up by the sun overhead. Wildflowers can also be plentiful along this route, depending on time of year. If you are feeling energetic, the Cassidy Arch trail, which can be linked with Grand Wash, climbs 1.5 miles to the canyon rim. The high vantage point provides good views of the canyon, but the best light for photography would be near the sunrise or sunset hours.
Surprise Canyon
There are several canyons that can be explored, many of which require all day or even multi-day hikes with overnight stays along the routes. Surprise Canyon is one that can be done easily in just a few hours, but still provides a backcountry feel, mainly because it is off the beaten path. To get to Surprise Canyon, go south on Notom-Bullfrog Road, which goes south from Highway 24 near the eastern park boundary. The first 10 miles or so of this road is paved, but then turns to gravel. The road parallels the Waterpocket Fold, so there are many stops along the way with fantastic landscape views. After approximately 25 miles of gravel, and many stops along the way, you will reach the trailhead for Surprise Canyon. I would recommend an early start to the day to catch the morning sun along the driving route, then late morning sun for the hike into the canyon. The hike is a relatively easy, 2-mile round trip into a deep cut in the Navajo Sandstone. The canyon never becomes narrow enough to be considered a slot canyon, but the immense rock walls on either side are amazing, nonetheless.
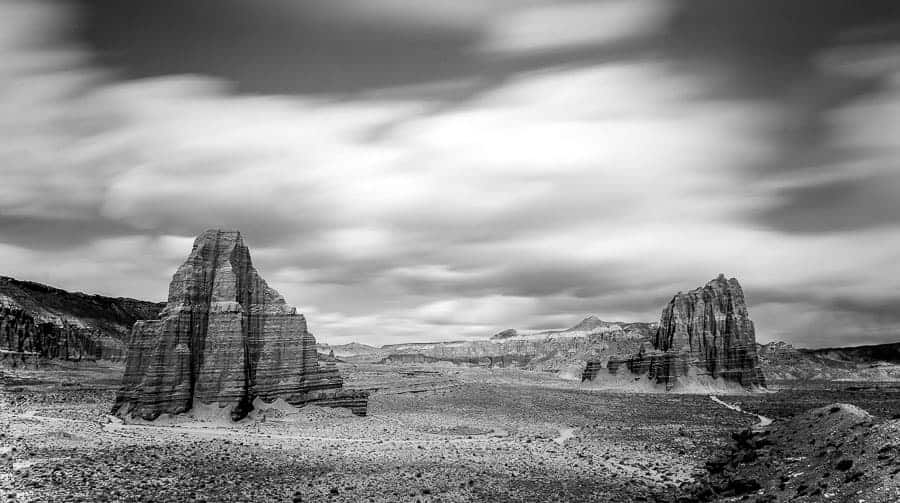
Cathedral Valley
For even more of a backcountry adventure, you may want to drive the Cathedral Valley loop, in the north end of the park. This is a remote area, with very little traffic. The roads are gravel/dirt and pass through several washes, requiring a high clearance vehicle. Make sure to watch the weather forecast when venturing into this area, as rain can quickly make the roads impassable. The day we traveled into this area, we stopped at Temple of the Sun and Temple of the Moon (shown if the photo below), two of the most prominent sandstone monoliths rising from the valley floor. The photographic opportunities abound here, with amazing views of colorful sandstone in every direction. Wildflowers (again, depending on time of year) and erosional patterns on the valley floor make for interesting foreground subjects for landscape images. After hiking around and photographing in this area for a couple of hours, we had to make a quick exit due to imposing storm clouds, but there is much more to explore. I could only imagine how dark the skies would be on a moonless night. If weather conditions are favorable, a late night drive into this area for Milky Way and star trail shooting would be incredible. Then stick around for the sunrise to light up the rock formations a bright reddish-orange.
Photography Locations Around Capitol Reef
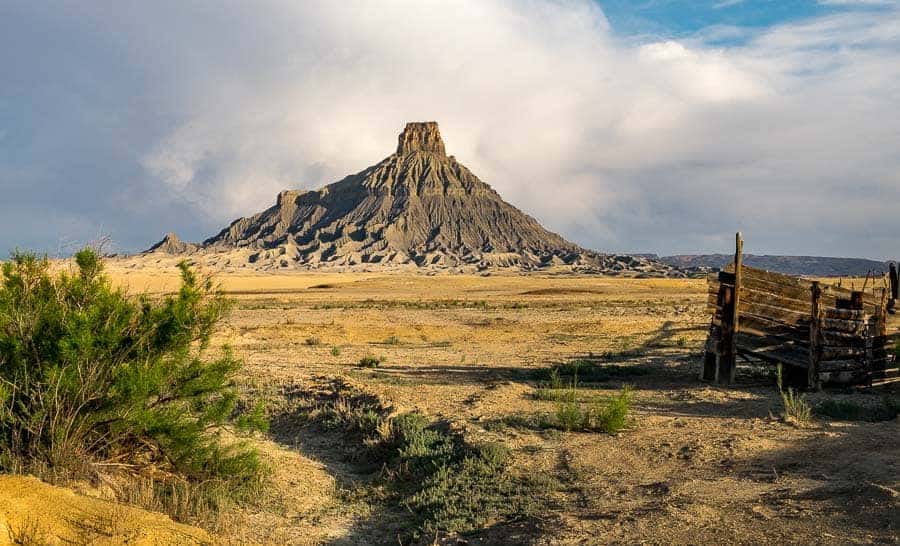
Factory Butte
If you travel into Capitol Reef from the east, you will undoubtedly notice Factory Butte, an isolated, flat-topped sandstone peak rising high above the barren landscape. To get to Factory Butte, leave the park going east on Highway 24. Travel approximately 20 miles to Coal Mine Road. After turning north onto this gravel road, Factory Butte will be the most prominent feature to the north and west. Approximately 4 miles up Coal Mine Road is a small pond and remnants of an old corral that provide some nice foreground interest for photographs. It can be tough to get good light, but the best bet will be to arrive before sunrise and wait for the butte to be lit up.
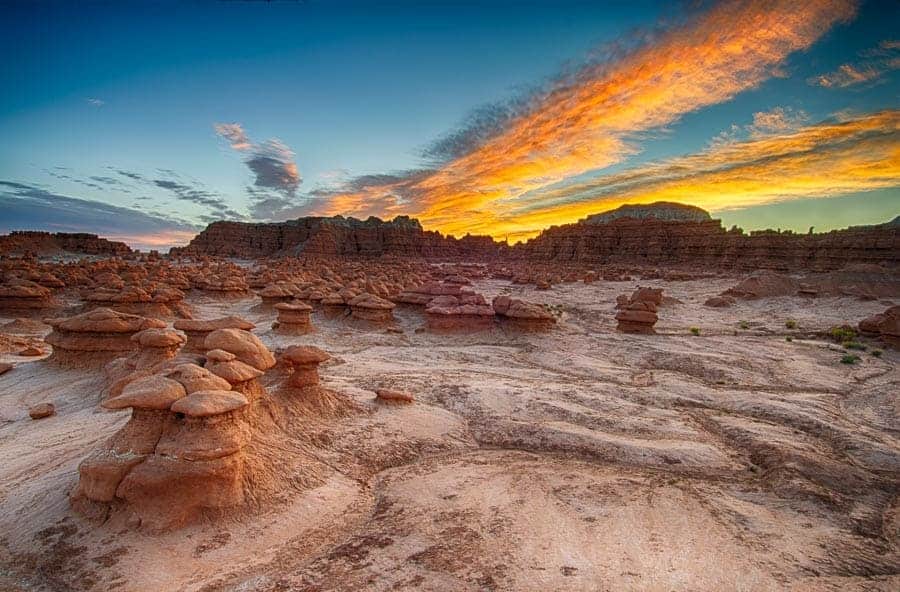
Goblin Valley State Park
A little further up Highway 24, approximately an hour north of Capitol Reef, is Goblin Valley State Park. This park gets its name from the hundreds of hoodoos, resembling goblins, that formed as softer sandstone layers eroded away beneath a more resistant cap layer. What's left behind are mushroom shaped forms that can be several feet high, and seem to stand watch over the area. Goblin Valley State Park is a unique place, and definitely worth a side trip. Sunrise or sunset are the best times for photography. If you stick around after dark, astrophotography mixed in with lightpainting the hoodoos could create some really dramatic images.
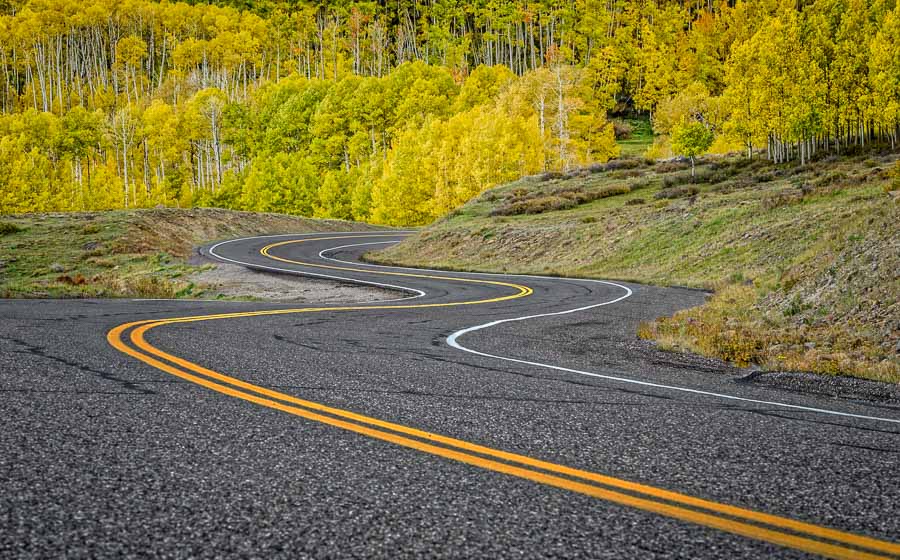
Boulder Mountain
For more mountainous scenery, including lots of aspen trees and small lakes, you may want to travel south out of Torrey on Utah Scenic Byway 12 to Boulder Mountain. The mountain rises to a height of just over 11,300 feet and the forests and meadows at the top make up the highest timbered plateau in North America. This is a very scenic drive, especially in the fall when the aspen leaves change to a golden yellow. The photograph below was made on a trip through the area back in October 2013, when the mountainside was bathed in the golden yellow of changing aspen leaves.
Pack Your Bags
I hope this article will provide some useful information for anyone who is considering a trip to Capitol Reef. Or, if you haven't considered it, maybe this will provide some inspiration. Whatever the case may be, the information provided here is a general guide for photographing in and around Capitol Reef National Park. It is by no means an exhaustive list of every location. If you have a favorite spot that isn't listed here or additional tips for photography in this area, please share in the comments below.
Thanks, Rusty! What a wonderfully comprehensive and complete article at such a beautiful place!
Thanks John! It is such a beautiful place. I’m ready to go back already!
Thanks for this extensive write up Rusty, I know how long it must have taken. This park is on my list to see soon!! thanks bud, I learned something new 🙂
Thanks for the read, Steve! Glad you enjoyed it. Move this one up your list.
Thanks, Rusty–We seem to be stuck on hiking the southern Utah canyons, but your article is a good reminder of what lies to the north!
Thanks Mike. The nice thing is that Capitol Reef isn’t too far north. Utah is so packed with things to see and photograph, I could spend a solid month and still not get everywhere I’d like to go. So many places…so little time!
Rusty,
Thank you for taking the time to write this. I am going to Capitol Reef in late August. Unfortunately, I’ll only have a day or part of a day. If you could shoot for that time period, what would be your top pick for places?
Thanks Charles. That’s a tough call. I would consider doing the Hickman Bridge hike in the morning; taking the Scenic Drive and making a few stops at interesting locations along the way; then catch sunset at Panorama Point. You can also learn some of the interesting geology of the area at the visitor center, which may be a good place to stop in the afternoon if it is hot outside. Have a great time!
Thank you for all the information. I am from Germany and will be in Utah in October. I decided to stop by this park in my way from the south to the north. I am a hobby photographer. I found this page on my research. All the Information will help me to use my short limited time wisly.
Thank you for your work.
Thanks for sharing the information, I’m actually planning a visit to the park on Nov 7th or 8th, and I probably will be driving from Salt Lake City, my major purpose is to capture the Milky Way, looks like the Panorama Point is a nice place, my question is: where can I park my car?
Well shoot, I just saw this comment. Sorry for the late reply, Jack. November is really too late for shooting the Milky Way in the northern hemisphere. I hope you had a great visit anyway. As you probably discovered, there is ample parking at Panorama Point. Thanks for reading!
This was a tremendously helpful article. We recently changed our vacation plans to include a one-night stopover at Capitol Reef. I appreciate your thoughts on the park’s features from a photographer’s perspective. If the road and weather conditions are good, I’m going to do a very early morning trek up the Cathedral Road to do some astrophotography, and then catch the Temples of the Sun and Moon at sunrise. Best wishes to you.
Great article with stunning images! Getting a taste of the Mighty Five this Spring and have one night in Capitol Reef. Your article gives us just the information we needed. Thanks,
Great article. I’m a hobby photographer and I’m going to Utah in mid-April 2017 for a week (I’ve never been before) and I’ve been struggling trying to determine which parks I want to photograph in. There are so many to choose from and with limited time, I know I can’t explore them all. After reading this article Capitol Reef is the place I’m heading. Seems like there is a lot of locations to explore and you can map out a day well by picking a location for sunrise, doing some day hiking/driving, get to another place for sunset and then hope the skies are on your side for some nighttime photography. I’m thinking of 2 nights in Capitol Reef (approaching the park from the east/Arches area) Would love your thoughts on what type of shooting location plan you would set up for this duration. Thanks again. This was really inspiring
This a great read and a detailed guide to the area. I am in Boise, Idaho and am planning a fall trip to Utah and Capitol Reef may just be on the top of my list. I will be dragging a medium size camping trailer. Do have any advice on dragging this addition to a photo journey like Capitol Reef and where to stay or park the beast.
John Beliera
Hi John,
I’ve visited Capitol Reef a couple of times with a fifth wheel camper. If you get lucky and there are open spaces, the Fruita Campground is in the heart of the orchards and the right at the start of the scenic drive. There are also several RV parks in Torrey. I’ve stayed at Thousand Lakes RV park both times and it’s a nice park, but it’s at the opposite end of town, so the farthest from the park (not that Torrey is a big town). Also there is Sleepy Hollow RV park near the road to Cathedral Valley, which is handy because the turn-off is about 30 miles from Torrey. I’m staying there this trip so it’ll be a little easier to get out to Cathedral Valley. Hope that helps.
Liz Reed
Thank you so much for the comprehensive and informative post on Capitol Reef. I am headed to the Utah Five in a week and I will spend 4 days in CR. Thanks to you, those days will be well spent. Your photographs are such an inspiration. I really appreciate your effort and vision. Be well and stay safe!
That sounds like an awesome trip, Sharon! Utah is such an amazing place to photograph, and there are so many cool places in CR. Take your time to explore, have fun, and be safe out there. Thanks for reading!