

Luminosity Selections & Masks: Amazing Power and Control And Not As Hard As You May Think
There is a very good probability that you have heard the term “Luminosity Masks” since you have been involved with digital photography. It is one of those “scary, complex” terms used to describe a technique or method to edit digital images that only “the pros and super advanced” photographers and image editors use since they are so wildly complex and for advanced users only. This is a myth. I will explain why and also, since I've only been using Photoshop for a little over a year, promise you that you also can learn to use these powerful masks/selections in your digital workflow to apply edits and enhancements that you could not implement using any other method.
You must remember that nothing in working with digital images is “too hard” to understand. It's all a matter of taking time to learn certain techniques and of course, practicing them. It is important to have this in mind because it's very easy for people to get discouraged and say “Ah that's too much for me!” – when this is NOT at all the case here. If you go into anything thinking it's too difficult to learn and you're never going to “get it” – you will always be right; you will fail! However, if you do go into something knowing you'll grasp and understand the material that you are learning, you will 100% learn it. I cannot say enough how once you grasp the simple basics here, using these mask actually makes many things much more simple! But enough of the pep talk, let’s get right to it!
What is a luminosity mask?
In Photoshop, we have a myriad of tools to choose from for various tasks. Many of these tools are to make selections. For instance, take the simple rectangular marquee tool. You click and drag an area to be selected and when you release your mouse button, the “marching ants” (the moving outline when a selection is made) will show what AREA of the image is selected. Same holds true for a tool such as the lasso tool. They are tools that select pixels based on AREA – an area YOU have chosen.
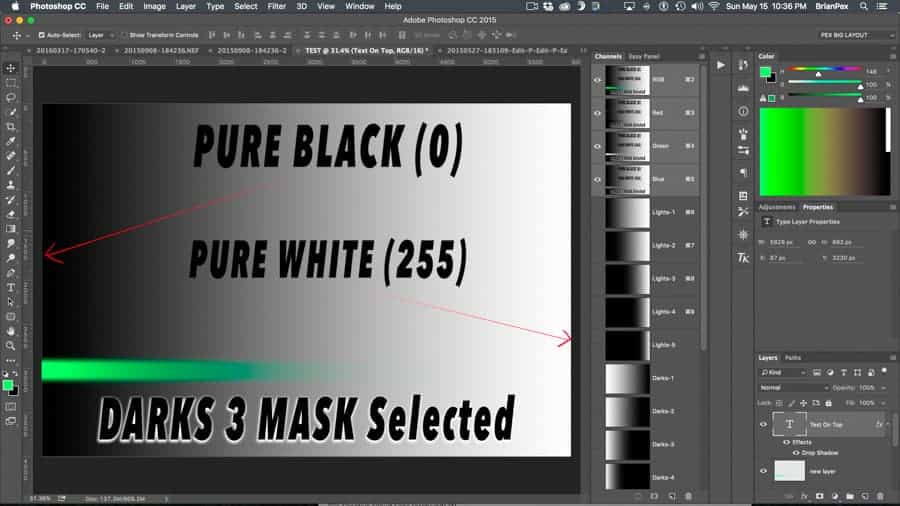
Luminosity masks are also selections but rather than an area, they are based on tonal values. All images have a tonal range from 0 (pure black) to 255 (pure white) and everything in between is a various shade of grey from super dark to super light. Think of black as NO COLOR (Therefore ZERO) and White ALL COLORS (255 or the highest tonal value). Color isn't chosen in luminosity selections. These selections are simply grey tone graphical representations of pixel luminosity value within an image. What this means is that instead of YOU selecting an area of pixels, the pixels are chosen for you in varying shades by the pixels themselves. You will always get the proper tonal selection because the image itself dictates what gets selected and what is not selected or partially selected. In short, the selection is perfect each and every time because the image is the image – simple!
How are Luminosity Selections created?
Luminosity masks are not a built in part of photoshop like the paint brush, lasso, eraser, etc. Those are tools and just a few of the many. Luminosity masks are selections that are made and live in the CHANNELS panel within Photoshop. They are called Luminosity Masks but in actuality they aren't “MASKS” until they are used in the layers panel. But, to keep things simple, we can call them Luminosity Masks or Luminosity Selections. When you click on the Channels panel, you will always see 4 Channels in ALL images. They are RGB, Red Channel, Green Channel and Blue Channel. RGB is simply a combination of all three Channels (RGB = RED GREEN BLUE) – simple.
Creating Light Tone Luminosity Selections
Click Here For Video To Go Along With The Following:
To create Luminosity Mask, you must first move to the RGB Channel. Once there, Press CMD or CTRL and left click to make a selection of that channel. You will now see the marching ants. That is the term used to describe the moving outline around the selected areas. This is showing us that a selection has been made and is active. To actually see the mask you have just selected, you need to move to the bottom of the channels panel and hit the SAVE SELECTION icon to create what is known as an “Alpha Channel” but again, don’t let the complex sounding term scare you. It is simply a new channel and you can rename them too just like you can name layers in the layers panel to keep things organized. This is basically a “Positive” of your image. Photoshop shows the brightest areas in the image as lighter or even pure white if totally white. Darker areas are shown as, well, dark. This first channel is very much straight forward and pretty easy to understand.
So what do we do with this new Channel selection? We create more masks/selections from it! (Don't worry – there is a quicker way to do this – I'm just showing how these are made. You can get FREE ACTIONS PANEL HERE that will make these selections for you). Like we selected the RGB Channel before, we will now choose the new “Alpha 1” channel (We will rename these later), CMD click on this new channel like we did with the RGB channel. Again, you will see the marching ants appear. Now, and this is the big part, hold down CMD-OPTION-SHIFT (MAC) or CTRL-ALT-SHIFT (Windows) and have your mouse over the channel we are selecting. You will see a little “X” appear near the cursor. This is indicating that we are INTERSECTING (See video) the selection with itself. Don't worry – I know it sounds complicated but it isn't. What this will do is select even further into the brighter tones of the image. As you hold these keys down and click your mouse, the marching ants will change showing that a more selective area of the brighter areas have been chosen. Go down to the save selection icon again and click. You will now see Alpha 2. What you'll notice here is that the darker areas and non bright areas are now darker in the selection and the brighter areas are more restricted. This is selecting an even more targeted area of brighter pixels in the image.
Now follow this procedure 3 more times until we have five Alpha channels. This will give us 5 different levels of the bright portions of the image from wide to a very narrow selection of bright tones by the time we get to the last channel we made.
Creating Dark Tone Luminosity Selections
Next, we will create 5 “Darks” channels. Go the the first Alpha Channel we created for the lighter tones and CMD or CTRL click on this channel to make it active. Go down to the SAVE selection icon and click. Now you have an exact copy of Alpha 1. Why do we want that? We need this because we must now INVERT this channel to create the DARKS 1 Channel which will be called Alpha 6. This is an important concept to remember here. Unlike the logical bright channels (Alpha 1-5), the Darks Channels are reversed meaning the brighter areas in the channel are the darker areas of the image. The brighter areas of the image are now darker in the channel. This is very important to understand. To INVERT this Alpha 6 Channel, simply press CMD/CTRL + I.
This is essentially a grey tone negative of the image. Now we will do exactly what we did with the other channels above to create further darks Channels. CMD-Click on this new channel. A selection is made and you see the marching ants. Again, hold down CMD-OPT-SHIFT or CTRL-Alt-Shift on PC and click. Choose the save selection icon and now we have our second darks selection made and ready to use in the channels panel. Continue this 3 more times until we have 5 levels of darks masks.
Now For Midtones..
The middle tones of an image contain the tonal ranges that really can make a difference in how your image pops so we must now create a set of 5 mid tone selections. This is done a little differently than making Lites and Darks masks. First we go back to the RGB top Channel and Select ALL using CMD or CTRL+A. This will select the entire image. Now move to Aplha 1 (Or the first Lites channel we made) and hold down CMD + Opt or CTRL+Alt. A little Minus sign will appear. This is showing subtraction from the current selection. Click your mouse while on this Bright selection and then move to the first darks selection (Alpha 6) and do the same. You are essentially taking out the brightest areas of the image and the darkest areas and being left with the difference. A box will pop up saying that no pixels are chosen 50% or more and selection edges won’t be visible (No marching ants).. This is fine so just click ok. It is just letting us know that neither brights or darks are more than 50% selected with this selection. Once again, move down to the SAVE selection ICON and click. This is your MID TONES 1 Channel, or Alpha 11. (Again, all these “Alpha’s will be renamed!”)
For next Midtones Selection, again you must select entire image from the RGB Channel by selecting ALL (CMD or CTRL + A) and then subtraction the next lights and the next darks channels. So that would mean subtracting Alpha 2 and then Alpha 7 by holding down CMD+Opt or CTRL+Alt on each and clicking. This will continue for the next 3 levels of midtones. Just make sure to subtract them in order – Alpha 1 and 6, 2 and 7, 3 and 8 and so on. Make sure to watch video I have made here to make this much more simple. I have included these instructions to make these Channels so that you know what is happening and how they are made so it will aid you in how they work.
After all these 15 Channels have been made, we can now rename them starting with Alpha 1 becomming Lite 1. The next? Lite 2 and so on. When you get to Alpha 6, make it Darks 1. Alpha 7? Darks 2 and so on. You can name them anything you would like and you can make more than just 5 each. Most times 5 is more than enough. This is, of course, insane to think of doing every time you get an image into Photoshop and you want to edit them using Luminosity Masks. You can create ALL THESE masks in a single click using ACTIONS and the many panels available for either purchase or free download online. The one by Jimmy McIntyre (linked above and later in article) is free and creates 6 Channels for each lites, darks and midtones. It is simple and very nice to have. No one using luminosity masks makes them each time as was described here. It just wouldn’t make sense. Again, I’ve included how they are made so you understand what they are doing. Also, there are cases when you want to make a luminosity selection that is from another channel other than the RGB channel. For instance, if you want to make a tonal or saturation adjustment to the bright blue sky, you may want to make a selection that best selects the sky such as the BLUE CHANNEL. This article is just an introduction to these masks with hopes that you may look further into this wide topic to help better process your images.
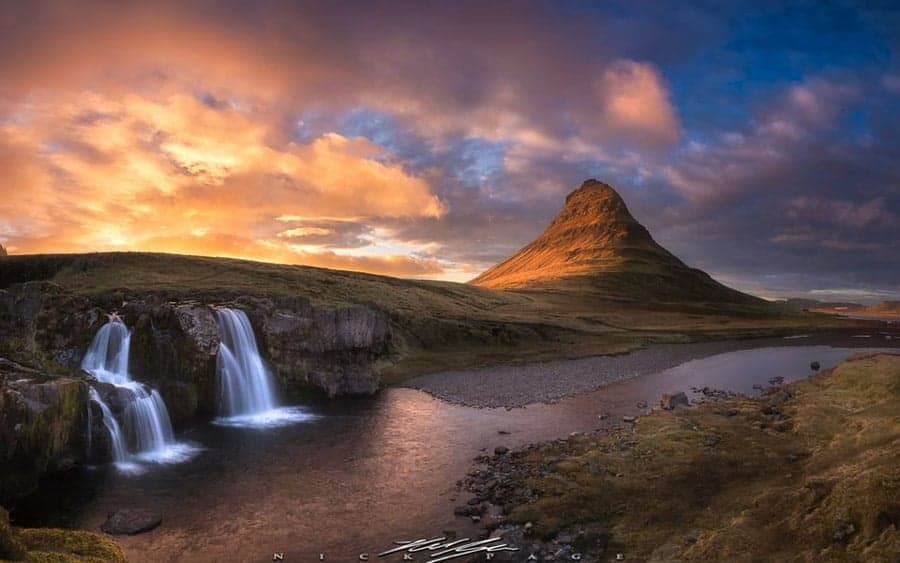
Luminosity masks can be an endless topic. Experimenting with these selections/masks is the key to becoming comfortable and proficient with them. Nick Page is one professional photographer many reading this may know from the Improve Photography network. He has stated that since introducing luminosity masking to his post processing workflow, his images have improved drastically. And I must say I agree. He has produced some AMAZING work in the last year and a half or so.
Luminosity Masks Uses and Techniques
Now that you have luminosity masks, what can you do with them? Well the answers to that are endless. Below is a list of several of the adjustments/technques that can be utilized using luminosity masks in your image making:
Exposure Blending Multiple Images
This is an area of interest for many who are looking into more about Luminosity mask. HDR Software does a good job and has gotten better as time progresses. However, a manually blended image using luminosity masking to blend two or more images together simply cannot be touched by HDR software. This is a bit more advanced and it does take some time with practice and understanding how to manipulate these masks to get the image to blend seamlessly and look flawless when done. There is a great video HERE that shows Luminosity Masking to blend images in Photoshop.
Many times in an image with high dynamic range simply dropping the highlights and boosting the shadows will work out to be ok. Your image sensor plays a huge part in this and they are getting better and better all the time. However, even the best equipment right now cannot capture the tonal range for all images. Many times the dynamic range is far too great. Bringing up the shadows introduces noise in the shadow areas since sensors have signal to noise problems that are just an inherrent characteristic of a digital sensor. The more signal (Light) the cleaner your image. The less light, the more noise. When this darker area is pushed to expose more, you will see noise and it is an unwanted aspect no one wants. By taking two or more images of varying exposures, we are able to blend in the BEST parts of each image for an ultra clean image with little or no noise in the image. This isn’t something that should be done with most images. This should be reserved for images that are really something you like and want to share or display once printed. Also, high dynamic range images are prime candidates for this technique.

Curves and Levels Adjustments
With luminosity selections active, you can make any adjustment that photoshop offers while constraining your selections to these very specific tonal areas. An example here is using a very subtle MIDTONES selection. “Midtones 1”, for example, and a curves adjustment layer will allow you to increase contrast only in the midtones and keep the highlights and the shadows from being affected too much. This also increases saturation and can really add some punch to your images. This simple adjustment alone with the constraining characteristics of this slightly selected mask is a super useful adjustment for MANY images! It will allow you to increase contrast and boost saturation at the same time while not making the darks too “blocked up” or blowing out the highlights.
Here is a great video by Sean Bagshaw explaining tonal balance adjustments using luminosity masks. Take a LOOK HERE!
If you want to increase the darker areas of your images ever so slightly or decrease the highlights in your images, a simple curves or levels adjustment is just the trick you need when used along with luminosity masks. These masks constrain the adjustments to very specific areas of the image and only those pixels are selected while the surrounding pixels are slightly affected but since the pixels themselves dictate the level of selection, they will ALWAYS be feathered perfectly and naturally.
Painting Through Luminosity Selections
One of the very best uses for Luminosity Masks is that they give you the ability to “Paint Through” selections using the selection that is made tonally so you can use your brush but not have to worry about spilling over either your adjustment or brush strokes during dodging and burning into unintended areas of your image. In addition to that, as tonal differences occur, your brush strokes will automatically be controlled on the level of the selected pixels.
What does that mean? Suppose you're trying to bring out a nice highlight or darkening a shadow area – With luminosity masks, it is simple. You can create a new dodge/burn layer (SEE HERE) and then make a selection of one of the luminosity masks that is showing the areas selected (White or Lite Grey). The mask you see that is showing that highlight or shadow can be selected and when you paint throught the layer, the paint will only “stick” to the areas selected by the mask. Since they feather off perfectly because the pixels themselves create the selection boundaries, you get nice gradual transitions in your edits. I cannot stress enough how amazingly powerful this single use is when editing your images. You may have heard of “Bumper Bowling” where they have bumper rails along the edges of the gutter so you cannot roll a gutter ball and make an “error.” This principal holds true sort of with these Masks. When you have a highlight area or a shadow area that you want to darken, lighten or even color, when you choose the proper Luminosity Selection, your brush strokes will only effect those pixels in that luminance range that the selection is dictating.
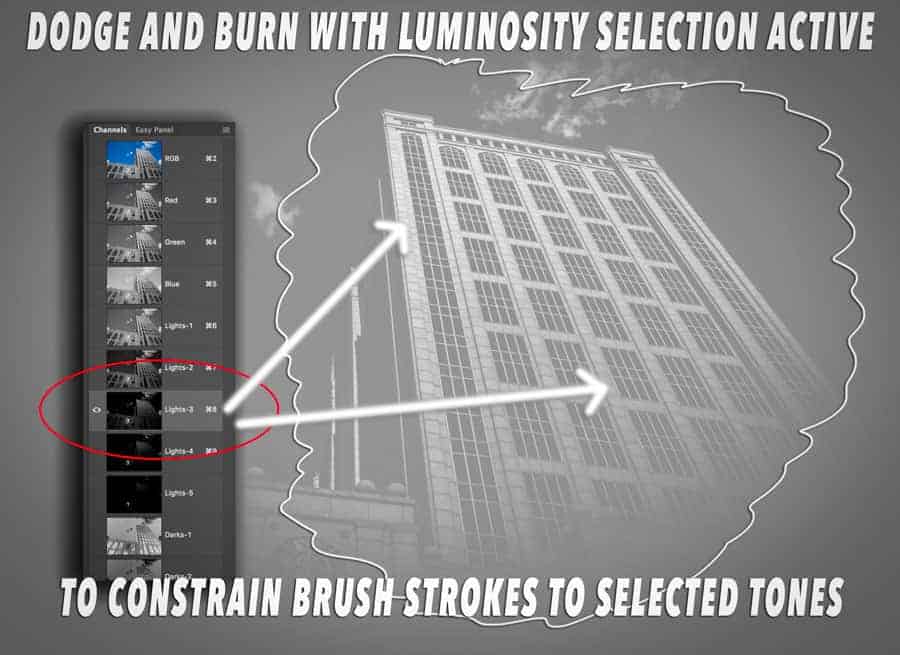
Dodging and Burning to Create Depth
I know I just mentioned painting through selections as a method that works super great while using luminosity masks but I think many may miss out on the power of these masks when editing people! That's right! Portraits can really benefit from dodging and burning based on tonal selections. Dodging and burning done in the proper tonal areas makes good images great. I would suggest watching THIS VIDEO for a quick demonstration on how useful this technique can be.
With a Luminosity Selection active, if you paint on a Dodge and Burn layer, the paint will be applied in varying shades automatically based on the tonal values selected. In this sample image, I was dodging (lightening) the face of a building in Boston, MA. You can see the corresponding “Lights 3” channel was selected and when I brushed through a 50% grey dodge and burn layer, the paint went perfectly to the areas I wanted it to go because the pixels were selected. You do not have to be careful to paint in areas you do not want to. The Luminosity selection does it for you!
Specific Noise Reduction
Digital sensors are getting better and better and before long the days of having excess noise in our images may be a thing of the past. Until then, we have to deal with these issues. One problem area in many images regarding noise is in the shadow areas. Since the shadow areas can be selected using Luminosity Masks, we can then apply noise reduction to ONLY the areas where we have noise. Digital image sensors work best when they are given a good amount of light. This is a signal to noise ratio characteristic of the image sensors. In photoshop, you can use a noise reduction plug in such as Topaz Denoise to reduce noise in your image. The problem is, even the best noise reduction software will decrease detail when the noise reduction is taking place. But since we have Luminosity Channels waiting to be selected in the channels panel, it is simply a natter of selecting a darks selection and then selecting it. While selected, create a new layer mask for that noise reduction layer. BINGO! Your image now has noise reduced ONLY in the areas where you want to reduce noise – the darker areas. This is one of MANY uses with the selections.
The Uses are Endless
With Luminosity selections and understanding how to use them, your image processing can really take off and very quickly. From adjusting saturation, brightness and contrast to dodging and burning, reducing noise, eliminating banding, creating EVEN MORE specific masks, etc – the list goes on and on.
There are several great photographers that specifically teach these techniques and offer panels that contain one button press actions to create these masks and many other adjustments in a simple ways that add a whole new dimension to Photoshop. I would suggest checking out the following experts on the topic. They have tons a free information available with low cost Actions Panels and even Free Simple Panels that are more than enough to get you up and running with these super powerful selections.
One important fact to be aware of is that each luminosity channel is a grey tone image and adds to file size. Be sure to delete these selections when done using them or your file size will be enormous.
JIMMY MCINTRYE – Make Sure To Get The EASY PANEL From Jimmy – FREE!
Please leave a comment below if you use luminosity masks in your workflow and tell us how you use them. Please share this article to anyone you know who may be interested in improving their image making. I feel these selections add a whole new world of possible adjustments to anyone's workflow who is willing to spend a little time to learn and practice these awesome techniques. I know I am looking forward to “playing” and learning much more – I hope you are as well.
This is great, Brian! I’ve been meaning to try to start introducing luminosity masks into my workflow (and been avoiding it). This should be a huge help!
Thank you Brian for such great information! The video was incredibly helpful too. I’ve never messed with luminosity masks but I’m going to start. This is a total game changer!
Make sure to check out the photographers links at the end of article. It is essential to understand the basics of Photoshop and how layers and layer masks work. The best way to learn is by doing. Practice over and over and you’ll get it quickly!!
Kevin – you’re welcome! I have spent a lot of time (too much) learning post processing at the expense of actually capturing good images with good light. It’s key to always start with somethings good to begin with – something I must do more of like most of us I am sure!
Brian this is an awesome article. I’m reading it from my ‘day job’ where we have internet filters that prevent viewing the videos you have linked. I want to call out sick to go home and watch them!!!! 🙂 Alas… can’t go doing that just now, but I’m going to be delving into this hard-core this weekend. Thanks for the amazing information!
Brian – I just saw this, great article and thanks for the mention!
I just saw this now Greg!! If written today I would for sure include you at the very top!
Well written Brian. Enjoy this article about luminosity mask as I ain’t an expert in graphics design. But this is true that I have Known many things.
Very well done, Brian. I’m with you and cannot understand why this technique has gotten such a reputation for being so complicated. I consider myself a novice PS user, but learned this fairly easy. You have done a great job in explaining this for any PS user and I am passing this along to my photo group. Thanks.
Thank you Brian. This is a great article. I look forward to checking out the videos. I came across Luminosity Masks from another Photographer who uses them almost exclusively in Black & White Photography: Ian Barber, in the UK. If your interested in using them for B&W Photography he has a wealth of insight as well:
https://www.digitalblackandwhite.co.uk
Thanks again, this is a big help!
Brian
You have a gift for true communication
Very rare
Marr