
Recently bit by the photography bug and wondering what post-processing is? Here is the definition for a beginning photographer.
[gap size=”2.313em”]
Post-Processing Defined
Here is my own attempt at defining what post-processing is for photography:
[blockquote cite=”Jeff Harmon – Hobbyist Editor, improvephotography.com” type=”left”]Using a process to transform photos from what was captured in a camera either to be closer to what our eyes saw, or to alter the image artistically.[/blockquote]
There is another contemporary term that is used synonymously with post-processing very frequently. In fact, as of 1992, the verb “photoshop” was formally added to the English dictionary because of how frequently it is used as a term in place of “post-processing”. So here is how Merriam-Webster defines “photoshop”:
[blockquote cite=”Marriam Webster Dictionary” type=”left”]transitive verb
: to alter (a digital image) with Photoshop software or other image-editing software especially in a way that distorts reality (as for deliberately deceptive purposes)[/blockquote]
Of course I prefer my definition. I don’t like the negative connotation at the end of the dictionary definition – there is plenty of beautiful and artistic work done in Photoshop without the least bit of deceptive intent. It is also true that post-processing for photography is very frequently done without using the Photoshop software product from Adobe at all (check out this article for why beginners should start with Adobe’s Lightroom product).
I can pretty well guarantee that every shot you have been impressed with in the past decade has been post-processed. Sure, a good photographer will get more out of a camera than someone who doesn’t know how to use it, but post-processing is a very big part of what makes a photographer today.
Alright. Fine. A couple of definitions here, but still not any clearer yet on what post-processing is for photography? In the simplest of terms, it is using software on a computer to alter a photo. There are lots of ways and reasons to do that.
Post-Processing Reliant Techniques
I think that walking through a few shooting techniques that rely on post-processing is the best way to help you understand what it is. These are pretty involved topics, but these are techniques photographers use knowing they will be post-processing the shots. Stick with me and it will be worth it.
RAW Shooting
Even as a very new beginner you have likely already been told that you should be “shooting RAW.” For good reason, a good portion of photographers (professional and hobbyist) shoot RAW. As a hobbyist photographer, I shoot RAW but I recommend a beginner either shoot JPEG or JPEG + RAW until they get more comfortable with the exposure triangle.

When a photographer shoots RAW they do so knowing that they will be doing post-processing on the images taken. You can think of RAW images being a little like being given raw hamburger meat that has to be cooked, while a JPEG is like being handed a fully cooked hamburger cooked exactly the same way every time (many camera models let you choose between a couple of recipes). Sure, you could add things to the fully cooked hamburger to change the flavor, but the options are fewer because the cooking is done.
The electronic sensors in our current digital cameras are pretty amazing, but very far from perfect. They are improving significantly with every new generation, but the signal coming out of them is not “clean.” Part of the valuable technology inside your camera is the algorithms built specifically to compensate for this. When comparing a JPEG to an un-processed RAW image, the RAW looks “soft” (slightly out of focus or lacking detail), “flat” (the difference between black and white is not as big as it should be, the colors are drab), and have other issues that need to be fixed.
Even if the settings of the camera are absolutely perfect for the shot, the raw data from the sensor requires that some work be done to make it be the best it can. When shooting JPEG the camera is doing this for you in a pre-determined way that can’t be reversed. When shooting RAW the photographer has to (or gets to) do this on the computer. This cooking of the RAW image using software on a computer is one form of post-processing.
High Dynamic Range (HDR)

Another type of photography that is done, knowing ahead of time that the images will be post-processed, is something called high dynamic range (HDR). Unfortunately, dynamic range is complicated enough it will need to be an article itself, one that I am going to be adding here at improvephotography.com soon, so watch out for it. Since that article doesn’t exist yet, let me try and explain it in a few sentences just so that you understand why you may need to do some post-processing in order to deal with scenes with high dynamic range.
As impressive and flexible as the sensors in our cameras are, the human eye is still significantly more amazing. Seriously, the more I learn about photography, the more I am impressed with just how cool our eyes are. The easiest way to explain dynamic range is to have you think back to the last breathtaking sunrise or sunset you saw. Remember how incredible it was? Remember the bright and vivid colors? Did you try to capture the moment with a photo? How did the photo compare with what you saw?
I am sure the answer is that the photo was not even close to what you saw with your eyes. Our eyes are amazing in their ability to take in an extremely wide range of light, or at least to switch between bright and dark so fast it feels like we can take it all in. The truth is no camera can capture that same range of light our eyes can handle. There is too big a difference between the brightest and darkest parts of a sunset for the camera to capture it all. When there is a really large difference between bright and dark (photographers say “highlights” for bright and “shadows” for dark) the scene is referred to having a high dynamic range.
There is a lot more to dynamic range than this, but hopefully you get the idea. You have seen for yourself just how limited your camera was in trying to capture the full dynamic range of a sunrise or sunset scene. But what about those awesome photos you have seen online where the sunrise or sunset looks a whole lot more like what you saw with your eyes? POST-PROCESSING!
There are tricks that photographers can do to compensate for the fact that the camera can’t really record all of the light at a scene. The camera does matter. Cameras are actually rated on their ability to capture dynamic range (the sensors in Nikon cameras are currently winning here). In fact, this is one of the biggest differences between your smartphone camera and a really good digital camera. But even the best digital camera can’t get it all – at least not yet.
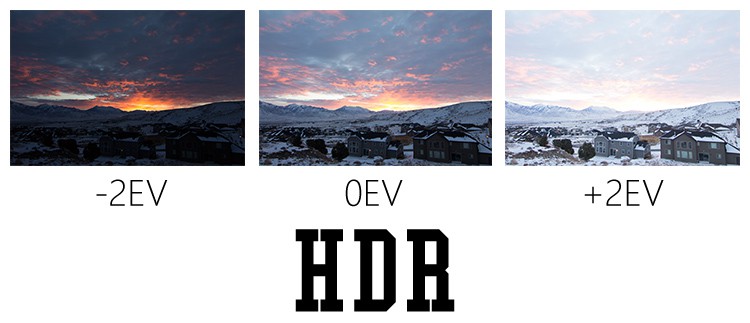 The HDR technique involves taking multiple shots of the scene with different exposures (photographers call this “bracketing”). For example, they may take one shot that is overexposed (too bright), one that is underexposed (too dark), and one that is “correctly exposed” (just right). Many cameras have a feature to do bracketing automatically, but since this is all done in the camera it isn’t post-processing. For several years now smartphones have had this built in as well, taking multiple shots, but they also do the next step automatically.
After a photographer has taken bracketed shots of a scene, they will import them onto their computer and use special software (Photoshop and Photomatix are two popular choices) to merge them together and make the scene look a lot more like what you saw with your eyes. This merging of multiple shots together into a single shot where the lighting is more balanced is another form of post-processing.
Expose to the Right (ETTR)
Another somewhat controversial topic here as not all photographers agree on the effectiveness of the technique, but “exposing to the right” is another term you may hear a photographer use. Again, a topic big enough to have an article alone, but let’s go through it the same way we did the other techniques.
Due to how it is the digital sensors inside our cameras function, they aren’t as good at capturing the shadows (remember these are the darker parts of the scene) in a shot. They are much better at capturing the highlights (the brighter parts). Because of this some photographers will purposefully overexpose the shot slightly so that the shadows are brighter. ETTR is another trick to get around the limitations of the camera not able to capture all of the light.
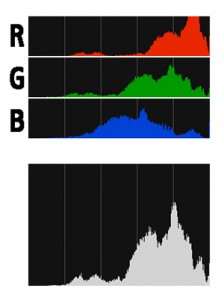
It is called “expose to the right” because of how a slightly overexposed image looks on a histogram where you can see that there is a lot more data on the right hand side (the brighter portions of the photo) than on the left hand side (the darker portions).
Since the ETTR method overexposes the shot, if you were to look at or print the photo without altering it the shot wouldn’t look too good. It would be too bright. So the photographer will take the photo this way knowing that when they import it onto the computer they will be using post-processing software (Lightroom is perfect for this) to alter the exposure, darkening it until it looks right. Altering the exposure of a photo is another form of post-processing.
Other Common Post-Processing
Now that we have gone over some shooting techniques photographers will use knowing ahead of time that they are going to post-process their photos in a specific way, let’s talk about a few of the other common things done in post-processing.
Exposure
As described earlier, ETTR is a technique where a photographer overexposes a shot on purpose in order to get better quality in the shadows. However, not all of us do this on purpose. As a beginner you are likely to miss the exposure frequently (all photographers do), getting shots that are overexposed and shots that are underexposed.
If you shoot in RAW (instead of JPEG) then you will have a pretty significant ability to “fix” the exposure using post-processing software. Raising the exposure brightens the entire photo at once, although you should note that raising it a lot will increase the noise (random spattering of pixels that are the wrong color) in the photo – especially the darker areas. Lowering the exposure darkness the entire photo at once (as done in ETTR).
If you are in wedding photography business you may find it quite difficult to fix exposure of hundreds images. I recommend to save your time and use presets or online photo editing services like wedding-retouching.com.
White Balance
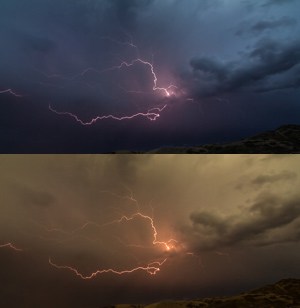
You have seen photos that aren’t white balanced properly, but you probably didn’t know what to call it. You know those indoor shots that look very yellow (photographers call this “warm”), blue (called “cool”), or have some other color tinge? This happens when the white balance the camera guessed at is not right. This is another example of just how awesome our eyes are. Well in this case it is probably our brains that do the work, but either way we have the ability to see something white and actually have it look that way in many different lighting situations. From a bright day outside to a candle lit room, we mostly see something white as white.
Our cameras do not have this ability. As the camera writes the image data taken by the sensor out to a file on the flash card, it has a limited range of color that can be represented in that data. In order to deal with this the file format (RAW or JPEG) includes the definition of a white balance point, a point in the scene that is defined to be a “neutral” color around which all the other colors in the shot are defined.
With your camera in auto-white balance (AWB) mode (which Jim, Darin, and I all recommend doing all the time), the camera analyzes the scene and makes its best guess about what this white balance point should be. Modern cameras do a pretty decent job of this, but it isn’t always right, and through post-processing a photographer can very easily change where that point is defined to be. You can make that yellow, dingy looking photo look like it should.
Even if the camera got the white balance “right,” the photographer may decide for creative reasons they want a white balance to be different from right. Jim has a great example of a photographer deciding ahead of time that they will do something creative with white balance in his article here about gel shifting.
Filters
If you have used nearly any form of social media to share a photo, you have already seen what simple filters can do. That part in the app as you are going to share a photo where you can make the photo look old, have a color tint, or apply some other kind of effect. In a very simple way, this is post-processing.
Post-processing tools like Lightroom offer filters far more capable than those you see offered in most apps on a smartphone. They are modeled after the physical filters some photographers use in front of the lens as the pictures are being taken, allowing a photographer to apply a similar effect to a shot once it is on the computer.
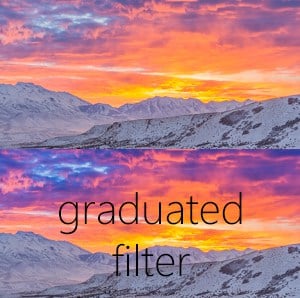
There are two basic types of post-processing filters: graduated and radial. Both types allow the same thing to be done to the photo, applying alterations in a pattern smoothly transitioning from a strong application of the effect to no application at all. The graduated type applies the effect in a straight line, top to bottom, left to right, upper left to lower right, etc. The radial type applies it in a circular pattern.
Let’s go back to the sunset photo from before, where HDR was a strategy that could be used to try and capture more of the light than can be done in a single shot. An alternative approach would be to apply a graduated filter to the photo where the exposure at the top of the photo is lowered until the horizon where it is left unaltered. Or the opposite could be done, increasing the exposure of the foreground that looks very dark in comparison to the brightness of the sky.
Conclusion
Hopefully you have a better idea now what post-processing is for photography – making your photos be there best through the use of software tools on a computer. Hopefully you also realize that post-processing is a very important part of modern photography. If you want to have your photos look anything like the shots you have seen online, you have to learn how to do post-processing. While there is plenty of free training you can find online in the way of articles and videos, if you want to get a good jump start into post-processing be sure to check out the excellent (and VERY reasonably priced) online training Jim and Darin offer on Lightroom and Photoshop over at photoclasses.com.
I’m an amateur photographer. A correct understanding of the theory is the basis of successful activity. I liked your article. Thanks for the info.