Two weeks ago, I found myself grabbing my DSLR, putting on a lens with no filter since that destroys image quality, putting it on a tripod and using a cable release to take the landscape photo, putting the camera in mirror lock-up mode for a night photo, turning on long-exposure noise reduction, and covering the optical viewfinder to prevent light leaks. I was doing it right. It was technical photography perfection.
And then, I snapped. I suddenly realized that I do all of those “technically perfect” things simply because I've been told they improve the image. Like most photographers, I was doing what other people told me to do. But the mark of a true expert is personally testing everything and not falling into the trap of believing the “old wives tales” or, in this case “old photographers tales.” So, I set out on a personal quest in the last two weeks to test everything in my workflow to weed out any useless steps. I want to reduce my photography to the simplest and purest forms so that I can come here to Improve Photography and teach you how to enjoy your photography more.
Thank you to the kind members of our community who helped with this article by submitting myth ideas. If you'd like to join us, please LIKE our Facebook Fan Page.
#1 A clear UV filter degrades image quality (True, but it's not as bad as you'd think)
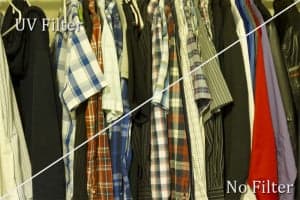
First of all, since this was a bigger test, I wrote a separate article just explaining my findings of this test and how I performed my testing. Here's a link to the full article, or simply read the summary of my findings below.
For years I have heard photographers say that putting a clear UV filter on a lens degrades the optical quality. It's usually a claim made without showing any proof. Many photographers use UV filters on their lenses to protect the front element of the lens from being scratched, but other photographers are too afraid to use one because it might reduce the sharpness. These photographers often make comparisons to putting cheap tires on a Ferrari, or say that it is ridiculous to put a cheap plastic filter in front of a $2,000 lens.
Believing this to be true, I have never used a clear UV filter on my lenses. I didn't even own a UV filter to test this belief, so I bought one from Amazon. I didn't just buy any UV filter. I bought the cheapest junkiest one I could find. I figured that if this junky filter didn't degrade the quality, then any UV filter would be fine. But one UV filter wasn't enough. Dustin Olsen, who now works with me on Improve Photography, also tested the belief with his UV filter using a different camera and different lens. In testing, neither Dustin nor I were able to see ANY reduction in the sharpness of the lens–even zoomed in to 100% with multiple examples. HOWEVER, while there was no reduction in sharpness at all, both Dustin and I found that the UV filter produced a minor color cast on the image. Also, the UV filter undoubtedly caused more lens flare when shooting toward a bright light source.
Takeaway from this photography test: There is no reason to panic about using a UV filter. It just doesn't make hardly any difference unless you're shooting into the sun. The color shift was actually very slight and I would think that nicer filters would not have this problem. What this test revealed to me is that UV filters do cause some problems, but it has nothing to do with the sharpness and the reduction in image quality is only very slight. I'll keep my UV filters off the camera unless the situation arises where it would be handy (like shooting in a very dirty environment or shooting near the ocean near sea spray).
#2 The native ISO (often ISO 200) produces less noise than ISO 100 (MYTH!)

Most photographers believe that ISO 100 will produce the most noise-free image; however, some photographers say that the native ISO of all Nikon DSLRs is 200, so they hypothesize that ISO 200 will produce less noise. So which is it? I was really anxious to test this myth because I wasn't sure of the answer myself.
Please note, as has been pointed out multiple times in the comments below, that these tests were done with the D7000 and a Canon Rebel. These cameras have a native ISO of 100, which automatically debunks the myth that the native ISO of all Nikons is 200–it is not. I'd love to see a reader test out this myth with a different Nikon that has a native ISO of 200, but I haven't seen anyone send in samples yet. My point here is that it is incorrect to state that all Nikons shoot with less noise at ISO 200. That isn't true.
I have heard so many people talking about native ISO lately that I thought it actually might be true that ISO 200 is slightly cleaner than 100, but it just isn't true. I took multiple shots at 100 and 200 ISO and compared the results. In every case, ISO 100 was slightly cleaner on my D7000 than the ISO 200 sample. It may be that this is not true for other cameras, but I found the same result on a Canon Rebel. ISO 100 is (very slightly) less noisy than ISO 200. I also tested ISO 125, 160, and 400. It is a perfect scale. The lower ISO produced the cleaner shot in every case. There seems to make no impact on the noise on t he camera models we tested (Nikon D7000 and Canon Rebel T3i). To see full-res image samples and read more about this test, read this article about the native ISO that I just posted to explain my methodology.
Takeaway from this photography test: The whole “all Nikons have a native ISO of 200” thing is… completely not true on the cameras we tested. I would love to see some readers test this on their cameras so I can verify it on more models, but it looks like this is a total myth.
#3 The DPI or PPI affects the viewing size of the image on screen (MYTH!)
I already knew this was a myth before writing this article, but it is such a common misconception that I thought I would share it with the community. Stated in the simplest possible terms, the pixels per inch of an image file doesn't matter one tiny bit when the photo is on your screen. The photo could be 300 PPI or 3,000 PPI and it would look precisely the same. Pixels per inch is merely a way to measure an image file. You can change the number to whatever you want and the image resolution won't be changed as long as the total number of pixels in the image is not altered. For most photographers, this is probably a new concept.
If you're interested in learning all the pixelly details of this photography myth, then check out this awesome article from iStockPhoto.
Takeaway form this photography myth: Don't worry about the DPI until you're ready to print the picture. The PPI has nothing to do with the viewing size of the image on your computer screen (although it does impact the file size).
#4 You can't adjust the white balance of a JPEG (MYTH!)

Several months ago, I mentioned this myth in an article I wrote. After the article, I had an exchange from an accomplished professional photographer on this topic. He vehemently defended his position that a white balance change on a JPEG somehow produces an inferior image quality to a white balance adjustment made to a RAW file. I emailed him two photos–one white balanced on the RAW, and one white balanced from the JPEG and asked him to identify the one with inferior image quality. He couldn't.
Then, he changed his argument to say that it wasn't that a white balance change to a JPEG produces inferior image quality, but that it was really hard to do. Nope. Just open the JPEG in camera RAW (yes, it's possible to open JPEGS in camera RAW) or Lightroom and make the adjustment just exactly the same way as you would change the white balance on a RAW file. No difference. I do not pretend that shooting JPEG is the same as shooting RAW. There is a huge difference in changing the exposure, picture style, or many other aspects of a RAW file when compared to a JPEG; however, it frankly is not true that white balancing a JPEG is somehow inferior. Don't believe me? Test it for yourself and see. Same thing.
Takeaway from this photography myth: Obviously, there are huge benefits to shooting in raw; however, it simply isn't true that JPEG white balance adjustments somehow produce poorer image quality than RAW white balance adjustments. There is a theoretical difference in the fact that the JPEG bakes in the adjustment and the RAW file can be changed losslessly, but if you can tell the difference between a photo white balanced from a JPEG and a photo white balanced from a RAW…. you have a better eye than I do.
#5 You need a commercial product for on-camera flash (MYTH!)
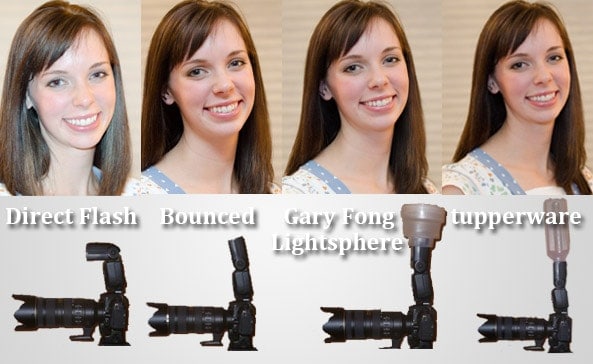
For the full run-down on this incredibly hilarious (and surprising) test, check out this separate post that I made to explain the whole thing. If you're more of a Cliff's Notes kind of person, then here is a summary of the test. Most wedding and event photographers turn to a commercial product like the Gary Fong Lightsphere, or a host of other products for on-camera flash. The purpose of an on-camera flash diffuser is to soften the light from a flash while staying portable to shoot a wedding reception, an event, or even your daughter's birthday party. It helps soften the flash and produce a prettier quality of light.
I usually just bounce the flash off the ceiling for on-camera flash, but this doesn't work when you're in a building with very tall ceilings or you are outside at a party at night. One of the most popular on-camera flash diffusers is the Gary Fong Lightsphere. I own one and have used it many times, but the Lightsphere costs $50! In my opinion, that is way too much money for a hunk of plastic that sits on top of my flash. When I started working on this article, I thought…. hey, that DOES look like a piece of tupperware! Naturally, I bribed my wife into posing (she's always a good sport) and compared the light quality of the Gary Fong Lightsphere to the light quality achieved from putting tupperware from the kitchen on my flash. The results? Indistinguishable.
Takeaway from this photography test: Save your money. I could not see any improvement from using the Gary Fong Lightsphere when compared to the tupperware. At first you might think that it would look ridiculous for a photographer to strap a piece of Tupperware to her flash and then shoot a professional job like a wedding reception, but you'll thank me when you have a handy bowl that you can fill with refreshments from the event. You save $49 and you get a bowl of goodies from each event you shoot. Fantastic!
#6 Mirror lock-up improves sharpness (MYTH!)
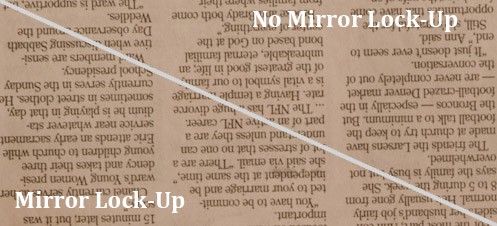
I really wanted this one to be true. I have gone through the pains of using mirror lockup for my landscape photography for years. I thought it was a main contributor to getting the sharp pictures that I try to capture. After EXTENSIVE testing, however, I was not able to replicate any tiny bit of improved sharpness in the photos where mirror-lock-up was used.
For newer photographers, the mirror in your DSLR flips up very quickly when an image is taken and this movement can cause vibration in the camera. Obviously, vibration can cause camera shake and reduce the sharpness of the image. Mirror lock-up makes the camera mirror open, and then some amount of time is waited before the shutter is tripped. This allows any vibration from the mirror flip to dissipate before the picture is taken.
It seems that mirror lock up provides no noticeable improvement in sharpness at any shutter speed as long as a sturdy tripod is used (which is advisable anyway). One reader tested this with a really cheap $20 Walmart kinda tripod and did in fact see a difference. I don't doubt it.
Click here for the full in-depth explanation of how I tested mirror lock-up.
Takeaway from this photography myth: Again, in theory, mirror lock-up sounds like a great way to reduce vibration and get sharper pictures; however, I tested this one over and over and was unable to see any improvement in photos shot with mirror lock-up compared to regular shots even when I was using long shutter speeds.

#7 Saving a JPEG multiple times degrades quality (MYTH!)
I was quite surprised by this test. It had always been my opinion that saving a JPEG multiple times degraded the image quality because each save of the photo means the JPEG is compressed again. While I believe that this would be true if a lower-quality JPEG were saved out each time, it turns out that–after saving the same JPEG 30 different times–there was no noticeable loss in image quality.
The photo here was saved from a RAW file, and then I open the file 30 times, saved out a JPEG of the file, then opened the new file and repeated the process. I did this 30 times and saved it on the highest quality in Photoshop each time. This myth actually quite handy to know. Sometimes I shoot a photo, do extensive editing, and save out a JPEG. If I later find a problem with the photo and want to make a little change, I always feel like I have to find the Photoshop file or start over with the RAW file.
Note that this testing was done using Photoshop's jpeg processor at full quality. Obviously, different programs can provide different results and–obviously–if you don't save at the highest quality, then data will be lost.
I posted an in-depth explanation of this test as well as more sample images here.
Takeaway from this photography test: It is true that every time you save a JPEG, the algorythm runs compression on the file and you do lose some data. That is undoubtedly true; however, this test reveals that you can do A LOT of saving of the JPEG and not see any VISIBLE reduction in image quality as long as you save at full resolution every time. Obviously, if you save a smaller file, you'll lose more data. If I can't tell the difference between a JPEG that has been saved out 30 times and the original… it probably isn't something to worry about.
#8 A high aperture is needed to get enough depth of field to take pictures of the stars at night (MYTH!)
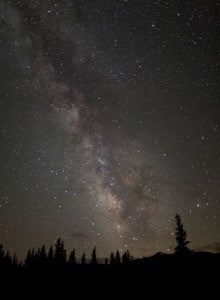
This is another myth that I was aware of before testing, but which is so commonly believed that it is worth the mention. Whenever I explain depth-of-field to a new class, I tell them that, when shooting a landscape, if you want to get the cool rock in the foreground as well as the sky in the background in focus, you need to use a high aperture to get full depth of field. So when I teach a night photography class, I usually find three-quarters of the class using f/22 so they “have enough depth of field to get the stars way out there in focus.” This is when I sit them down and we talk about depth-of-field and focus. If you believe this to be true, you're missing a big piece to the puzzle.
The truth is that most night photographers shoot the stars with an aperture of f/2.8 or f/3.5, etc. How do we get the stars in focus with such a large aperture? The answer is that the lens is FOCUSED on the stars. Since the lens is focused to infinity much closer than the stars, it makes no difference whether you're shooting a star that is relatively close to Earth, or one that is light years further away. If you enjoy night photography and want to learn more about shooting the stars and focus at night, you might enjoy my Night Photography eBook.
#9 IS/VR should be turned off when the camera is on a tripod (TRUYTH!)
It truly is amazing how photographers tend to divide over things so trite as whether or not image stabilization should be used when the camera is locked down on a tripod. Most photographers say that you should turn off image stabilization (vibration reduction) on your lens when using the DSLR on a tripod to prevent the image stabilization from being too sensitive and moving while the picture is taken and thereby creating the movement that the feature is meant to reduce.
I have gone back and forth on this issue over the years until I discovered something. It is something that male photographers have never seen, and if they have seen it, they have ignored it completely. The women photographers have probably known this for years. It's called the manual. Not manual exposure and not the camera manual. No, I mean the manual to your LENS! Yes, it is good for something… actually, a lot of things. The answer to this myth is that it depends on the specific lens. Some lenses have built-in the ability to turn image stabilization off automatically when the camera is locked down on a tripod. Other lenses do not do this. The only way to tell is to pull out your lens manual, blow off the dust, and find out. As it turns out, almost all of my Nikon lenses do this for me automatically.
Takeaway from this photography test: It depends on your lens, but if your lens manual reveals what my lens manuals did, you'll be able to save time by simply leaving image stabilization turned on all of the time.
#10 You need to cover the viewfinder for night photography to prevent any light leaks (MYTH!)
This is yet another common belief among photographers that makes theoretical sense, but if you actually test it…. it becomes much difficult to see the problem. When night photographers take long exposures of 30 seconds or more, they cover the optical viewfinder of the camera to prevent any ambient light from behind the photographer from entering through the clear viewfinder and showing up in the image. This makes perfect sense in theory, but despite my very best efforts to replicate this issue, I was unable to see the effects of the infamous “light leak.” My friend and colleague Dustin Olsen also tested this on his camera with identical results.
Update: A couple people commented below that the light leaks DO change the camera's light meter. While that may or may not be true, it left me wondering… WHY IN THE WORLD IS ANYONE TRUSTING THE LIGHT METER WHEN SHOOTING NIGHT PHOTOGRAPHY!?!? The amount of light available at night is simply insufficient to use aperture priority. It's all manual at night.
Takeaway from this test: I suppose if you're shooting a 5 hour exposure with a spotlight shining into the viewfinder, it would be possible to recreate the infamous light leak problem; however, even though I was trying my hardest to create a light leak, there was absolutely no difference in the resulting image. As far as I'm concerned, the light leak myth is completely busted. For notes on how I tested this myth, I posted a full explanation of my light leakage testing here.
#11 Lenses are sharpest at f/8 (MYTH… with some truth!)
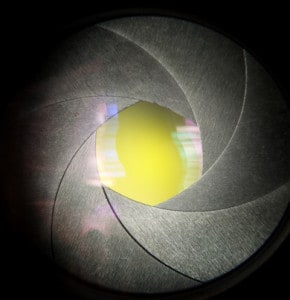
For the full in-depth explanation of how I tested this and to see sample images at these apertures, click here.
Let's be clear. There can be no doubt whatsoever that every lens has a “sweet spot” in which it produces the sharpest images. Most photographers already know this, but haven't taken the time to test their lenses to see what aperture actually produces the sharpest results.
With the lack of testing, they latch on to the sage wisdom that f/8 is the sharpest aperture. I often hear photographers so flippantly say “I'm shooting at f/8 for sharpness” that I thought it would be worth while to show the difference between different lenses and their sweet spots. Since this is a more involved test, I decided to dedicate an entire article this morning showing my findings from this test and how you can easily replicate it with your own lenses. Check out the full article here.
Takeaway from this photography test: Do not flippantly assume that f/8 or f/11 is generally the sharpest aperture. The truth is that it COMPLETELY depends on the lens. You can spend the rest of your life guessing, or you can actually pull out your lenses and test it in 15 minutes. To see my results and to learn how to do the test at home, check out the full article on this test.
#12 You won't share this page on Facebook or Pinterest, and you definitely won't click the Google+ button below (MYTH?)
Also, if you haven't joined the Improve Photography by LIKING our Facebook fan page, you're missing out on half of the fun!
Info About the Testing
You're more than welcome to disagree with any statement in this article and I'd like to hear what you've experienced that differs from my experience; HOWEVER (and it's a big however), please remember that I have ACTUALLY TESTED these myths. So if you want to disagree, keep in mind that I probably won't give your comment much credence if I don't see a test you've performed showing me different results. I realize that there are possible deficiencies in each of these tests. I get it–I'm not a scientist. I would LOVE to see all of these myths tested on a wider scale, so if you want to put any of these myths to the test and send me your results, I'd be glad to see what you get. I have, however, tested some of these myths (where applicable) with multiple camera brands/lenses/filters, etc.

well… most everything is correct here, but light leaks thru the viewfinder are real. at night its not much of a problem but if you shoot your calibration frames in the daytime, if you don’t cover the viewfinder your darks will be ruined.
ps if you are serious about astrophotography, turn off the in-camera dark subtraction and make darks yourself…
Great article. What’s funny, is that in the iStockPhoto article you linked to that explains image resolution, the very last thing they say is “Our system will change the dpi to 300 when it’s possible without re-saving the JPEG (since re-saving JPEGs degrades image quality).” I guess they should read post this as well! hehe.
I like this article. It’s time to go out there and start taking pictures and conduct your own experiment.
#1 – I do a lot of street protography at night (In Sweden we get 3-4 hours of daylight in november, and in summer we have FABULOUS bright summer nights, so it’s a no-brainer) and it took me less than five minutes to figure out that every traffic light showed up twice in the wiewfinder and kept dancing around the picture unless I held the camera steady. I removed the UV filter and retried, no more reflections. From that point I only use UV filters on lenses I consider too slow for hand-held night shots anyway.
#6 – Do you know if anyone has tested the hat trick as used by some astrophotographers? Cover the aperture of the telescope with a hat or similar (without touching it), open the shutter, do your exposure, cover again with the hat and close the shutter. Apparently this is done to counter shutter vibration and its friends.
#11 – Didn’t know that F/8 was sharpest. I knew of a rule of thumb that said the sweet spot was roughly three F-stops down from maximum aperture. Does that make more sense? Your 50mm lens seems like the oddball here, while it seems to apply to the 70-200 mm lens, and to most of my lenses. Any thoughts?
how many photographers does it take to change a light bulb? a thousand
one to change the bulb… and the other nine hundred and ninety nine to rant that they could do it better.
and i thought the people here are a bit more educated than the rest of the web.
anyway, great job jim. i really appreciate your articles, tutorials and posts. each piece provides me a different perspective on how to do my photography.
keep on posting!
Not only did I prove that #12 was a myth by Google +1-ing it, I also added it to my photography page at http://newsfury.com/Channel/5/photography.
Thanks for the great tips.
About myth #11 “Lens sharpest @ f8 or f11”, take a look at http://www.photozone.de/ Theses guys make extensive tests on lens and describe where is your sharpest aperture 😉
I have a UV filter on all my lenses, so it’s nice to know that doesn’t make much difference.
I’ll probably start shooting at ISO 100 for my landscapes.
BUT, when I leave VR on, with my Nikon 18-200, the images don’t line up (I shoot HDR), so I do turn that off when using a tripod. I believe that it doesn’t make a lick of difference with image quality though.
Somebody touched on this but native ISO for some of us is 200. I have always believed that native ISO was the lowest ISO number your camera can go. For my D300 and D300S then the native ISO is 200.
#6 – Like others had said before about mirror lock-up being dependent on your ISO, I think they real old wives tale about mirror lock up is something people were more used to doing with film cameras and have kept the tradition with digital. I specifically have seen a difference between my Hasselblad with and without a mirror lock up because of the large and loud parts moving. With digital cameras I haven’t witnessed it, but haven’t tried yet on different ISO.
I remember taking a portrait class long ago with a photographer who used mirror lock up constantly, not for image stability, but to keep clients from flinching last minute when they heard the loud noise of the mirror flip on the Hasselblad and ruining the picture with cringing or blinking. Always found that technique interesting and actually worked for him. Doubt it would be the same with today’s digital cameras.
I hate sloppy mythbusters 😉
Some of the busted myths are simply false assumptions, others not myths but facts in certain circumstances (can be considered good practice as precaution), and some facts but the difference matters only to perfectionists.
Number 4 spurs up a bit of speculation here. There is a tad difference between those two images and is disjunct with your statement calling it a “myth.
Number 2 is interesting, I need to try that out some time soon when I have time on my hands.
Other than that, there are some weird things in this article, but it was a nice read!
I am a professional photographer and there is one Myth that I would like to point out could incorrect in some situations.
#1) I found that candles and other point light sources in dark spaces, can cause reflections in odd spots on other parts of the frame. For example, I could have the candles at the top of the frame, and there would be a ghost image of it at the bottom of the frame. It drove me nuts. It also took me much longer that it should have to figure out what the problem was. Since this is a type of lighting I find a lot in my work, I discontinued protective filters about 5 years ago. Now the only time I use them is when I’m vacation with my family at the beach.
#4 You are correct. You can adjust white balance in JPEG and it will work. It will even work great…as long as the original white balance is close. If it is a fair distance off from what it should have been, or what you want, there will be a clear difference in quality. If you don’t believe me, take a camera outdoors with the white balance set to “tungsten” or “flourescent” and take some photos. Bring them home and process them from JPEG and RAW. You will see a difference. However, in the sample you showed, there would not be much difference because it was close to begin with.
I enjoyed the article!
JPEG myth. You should have asked a computer scientist (like me) about JPEGs as should the people who started this myth.
JPEG is compression just like any other compression, like say a zip file. If you zip a text file, when you unzip it you get the text back exactly as you had before. ow with the initial jpeg compression you do lose a slight bit of detail, but, like the zip when you uncompress it you get the image back.
Now on the next and all subsequent compressions, each time you compress and decompress you won’t lose any more detail as the decompression after the initial time gets you the exact copy of the file back unless you changed something of course. The compression alg is able to reverse it the same every time after that first one time loss of data.
Of course if you don’t believe me, you may go and look at the code.
Regarding Mike just said above, that is *only* true if the codec is well-written, employs no color-space adjustments, dithering, or other changes when opening the JPEG files, and the same Q-level is used each time.
But it is fundamentally wrong to apply that lack of additional generational (G2-Gn) quantization loss to photography. People don’t save JPEGs and open them again just to save them again. They do so do make changes, and those changes WILL result in additional loss to each modified MCU, and to the entire image if a different Q-level is used (or potentially if a different implementation is used).
By contrast, lossless algorithms such as LZW, RLE, and Huffman encoding have *no* data loss either on the first compression or additional generations of decompression and re-compression.
So, I call BS on Test #4. The test is an edge case that doesn’t match real-world use.
I really appreciate the advice from this guy. Simple, straightforward and to the point. People have so many different viewpoints on topics, but I find these the most useful. I’ll definitely be visiting the site a lot. Already following on facebook as well.
Thanks for excellent articles and advice…
@Nicky – Thank you for the compliment and I look forward to interacting with you on the Facebook page. Whenever you have a photography question, the facebook page is a great place to ask!
The tips & advices are excellent, bt everything regarding photography, is being adviced, considering ONLY D-SLR OWNERS. What abt the people like ME, who use a poor coolpix..?? Can’t we get some tips from so many LIVING LEGENDS..??
@Dhananjay – Sorry, I feel your pain about being too focused on DSLR users. I know people sometimes feel that way and you’re right that there should be more information available for point-and-shoots. Unfortunately, over 99% of my audience shoots a DSLR, so I have to write to the masses. I’m sure you understand.
The D80 has ISO 100, for anyone that has one (or remembers them!)
Id say you are wrong on the JPG’s. I assure you that looking the 5 year old pictures from a 19 year old that has kept them since can prove that JPGs lose quality over time (if in use)
Myth #4 – Oh man, I completely disagree. I guessed the first picture as being jpeg right off the bat because of the loss in detail in the dark areas under his right eye. Granted it was a small difference and I noticed only because I’m a professional photographer. But, I think the original image didn’t need much white balance adjustment to begin with. Going from 5200 to 3700K correct for incandescent lighting, or worse from 6500K (to correct from shade) to 3700K would be more obvious in the skin tones. It would have required manipulation of the color wheel and tone curve on the jpeg. With RAW white balance, 100% of the information is available for manipulation. You can go from 8000K shot in-camera to 2900K afterward and it would be like you shot it at 2900K to begin with. No difference between in-camera or post processing. I’ve spent hours adjusting images from an assistant who mistakenly shot in jpeg to try to get them to match mine shot in RAW. WB adjustment between RAW and jpeg is definitely not the same.