Most photographers spend a lot of time in Photoshop. We do our best to learn tips and tricks on how to use Photoshop to create various effects, but if you're still using Photoshop on its default settings and preferences, you're totally missing out. Today I made a list of a few customizations I always make to Photoshop when I install it on a computer.
These quick changes you can make to Photoshop will make your digital image editing faster, nicer, and you will experience fewer instances of the program crashing.
Five Minute Upgrade #1: Set up your cache levels
You don't need to know what a “cache level” is in order to get improved performance out of this tip. Just trust me, it will speed up Photoshop. In Photoshop, click Edit > Preferences > Performance > and then look for where it says “cache levels” on the right. The default number is four. Depending on how you work, you will want to change this number. Since most photographers open a lot of files in Photoshop and only make one or two quick changes, it is better for photographers to change this number to 1. If you're the type of photographer that uses dozens of layers and uses resource-intensive edits (such as gaussian blur), then you might want to make this a higher number, such as 6.
Just in case you're curious, here's an explanation from Adobe on how cache levels work: “Photoshop uses image caching to speed the redraw of high-resolution images. With caching, Photoshop uses low-resolution versions of images to quickly update the image onscreen as you work. The Cache Levels option allows you to tell Photoshop to save from 1-8 levels of cached image data. The more cache levels you have, the slower Photoshop opens the file, but the more responsive it is while you work. The fewer cache levels you have, the faster the image loads, but slower Photoshop performs.”
Make Photoshop Faster #2: Reduce your history states
Before you leave the screen where you just adjusted your cache levels, you should also change the number of history states that Photoshop stores. For each history state you save, Photoshop has to store an original size of the photo in the state. In short, it means slowing you down significantly. As long as you know how to work non-destructively in Photoshop and you don't regularly find yourself going back more than 5 or 10 states to undo a mistake you've made, I would change the number of history states to 5. Rarely do I find myself needing to click “Undo” more than 5 times, so this is the right setting for me (and most photographers).
 Make Photoshop Faster #3: Turn off image preview saving
One default preference in Photoshop that makes it slower to open photos is when it saves image previews. To turn off this setting, go to Edit > Preferences >File Handling > and then choose “Never Save” under Image Previews. Ahh… the joy of a faster Photoshop experience.
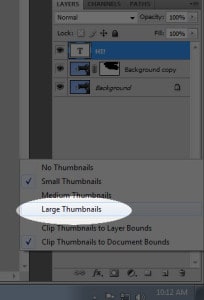
Make Photoshop Nicer #4: Use larger layer thumbnails
When I am working on a photo and create several layers, the tiny little thumbnails are difficult to see. In fact, I usually have to click the “hide layer” eye icon a few times to see what the layer impacts since the thumbnail is just too tiny to see (and I have 20/20 vision). It drives me insane to work in Photoshop without changing this setting to get larger layer thumbnails. To change it, simply right click anywhere in the plain gray space of the layers palette, and then choose “Large thumbnails.” After you do this five minute upgrade, you'll be wondering why you didn't know about this before!
Make Photoshop Faster #5: UNfix the memory setting in Photoshop
This is a VERY common mistake made by photographers when they try to speed up Photoshop. In the panel we were using earlier, found at Edit > Preferences > Performance > Memory Usage. When photographers find that Photoshop is running slowly, many users increase the amount of RAM that Photoshop can use. In many or most cases, this will actually slow Photoshop down if you turn this setting up too high. Why would that slow down Photoshop? When this setting is too high, Photoshop and your operating system can't access the needed RAM, so it uses virtual RAM on your hard drive, which is significantly slower. If you're going to change this setting at all, always keep it within the ideal range that is stated in the window and never adjust this setting by more than 5% without re-starting Photoshop and testing your performance. My advice? Just don't touch this one, especially because many photographers use many resource-intensive programs at once (such as Lightroom and Photoshop), so you need the RAM balanced equally between them.
If you enjoy these daily photography tips, LIKE Improve Photography on Facebook or you can follow us on Twitter.

nice tips.. thanks…